Advanced Secret Management on Kubernetes With Pulumi: Secrets Store CSI Driver
E
Cloud Native Pilgrim | Kubernetes Enthusiast | Serverless Believer | Customer Experience Architect @ Pulumi | (he/him) | CK{A,AD} |
Search for a command to run...
Cloud Native Pilgrim | Kubernetes Enthusiast | Serverless Believer | Customer Experience Architect @ Pulumi | (he/him) | CK{A,AD} |
No comments yet. Be the first to comment.
GPU scheduling in Kubernetes has always felt like buying a mansion when you need a studio apartment. A small inference workload that needs 2GB of GPU memory gets scheduled on an entire 80GB A100, and there's nothing you can do about it. The device pl...

TL;DR: The code https://github.com/dirien/quick-bites Nothing is more controversial in the Kubernetes community than whether to use Helm or Kustomize. I always advocate the philosophy of using the right tool for the right job. It avoids the problem...

TL;DR Le code https://github.com/dirien/quick-bites Introduction This article is part three of my series on secret management on Kubernetes with the help of Pulumi. In my first article, we talked about the Sealed Secrets controller. The second arti...

With AWS Lambda

Disaster Recovery, Data Migration made easy!

This article is part two of my series on how to manage secrets on Kubernetes with the help of Pulumi. In my first article, we talked about the Sealed Secrets controller to encrypt secrets and decrypt them on the cluster.
The Sealed Secrets controller is a great tool to use, and it's better than having no secrets management at all. At this point, we are not even considering the Kubernetes native secrets as a viable option in a GitOps workflow.
So what's the problem with Sealed Secrets? For me there are several reasons not to use it:
In a good SecOps world, every environment should have its own set of secrets. With Sealed Secrets, you need to seal the secrets for every environment. Now add multiple clusters to the mix, and you have a lot of Sealed Secrets to manage. I found this a major nuisance and a lot of work to maintain.
Collaborating with other teams is a pain. More often, the owner of a service is providing the secrets to the team that is consuming the service. This means the service owner needs to have the proper tools installed to seal a secret and to know how to use git at all. This is a lot of overhead for the service owner and a lot of room for error. Yes, you could argue that there could be automation to do this. But the reality is that this is not always the case, especially in enterprises, where there are a lot of legacy systems or the teams are not that familiar with the concept of DevOps and still organized in silos.
Truth is, there are better alternatives out there. A git repository is not designed to act as a key management tool. There is no support for the rotation of keys, performing usage audits, and so on. A proper key management tool is designed for this and has a lot more functionality than you need for a secure environment. It reduces the attack surface and offers mitigation paths in case a key is compromised.
Let us look in this article at the Secret Store CSI Driver as the first alternative to the Sealed Secrets controller.
The first thing you may notice is that in the name of the Secret Store CSI Driver, there is a reference to the Container Storage Interface (CSI) standard. What is CSI and why it is used in the Secret Store CSI Driver?
The Container Storage Interface (CSI) is a standard to unify the interface between container orchestrators (like Kubernetes) and different storage vendors (like NetApp, Ceph, etc.). This helps to guarantee that implementing a CSI for a storage vendor is going to work with all orchestrators that support CSI.
Before CSI, we needed to create volume plugins for every orchestrator and storage vendor. This meant that volume plugin development was coupled and dependent on the Kubernetes version. Bugs in volume plugins could break the Kubernetes components, instead of just the volume plugin. In addition, volume plugins got full privileges on the Kubernetes components like the kubelet.
The Secret Store CSI Driver is a CSI driver that allows you to mount multiple secrets, certificates, and keys from external secret stores into Kubernetes pods as volumes. After the volume is attached, the secrets are mounted into the container file system.
The benefits of using the Secret Store CSI Driver are that you manage the lifecycle of the secrets outside of Kubernetes while still providing a Kubernetes-native experience of using the secrets in your pods.
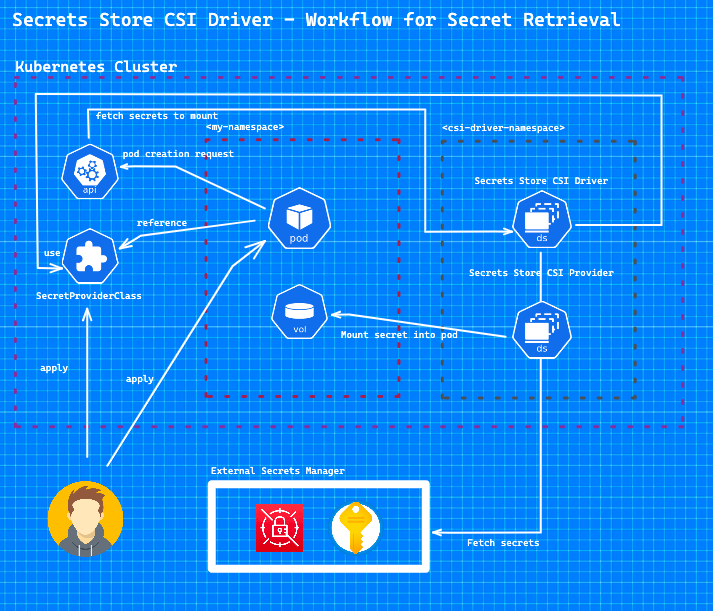
The Secret Store CSI Driver is a daemonset that let all kublets communicate with each other and uses gRPC to talk to a provider. The definition of the external Secret Store is specified in a SecretProviderClass custom resource. Then a volume is mounted in the pod as tmpfs and the secret is injected into the volume. When the pod is deleted, the volume is cleaned up and the secret is removed from the tmpfs volume.
The Secret Store CSI Driver supports multiple providers to access the secrets. The following providers are currently supported:
Azure Key Vault
AWS Secrets Manager
HashiCorp Vault
GCP Secret Manager
You have to keep in mind that each provider has its own set of configuration options for things like authentication. In this article, I will use the Azure Key Vault and AWS Secrets Manager provider and show you how to use them.
To follow this article, you will need the following:
Pulumi CLI installed.
kubectl installed.
optional K9s, if you want to quickly interact with your cluster.
And depending on which Secret Store provider you want to use, you will need an account with the provider.
AWS: AWS account
Azure: Azure account
In the last article, I showed how to install Pulumi and initialize a new project. So I will not repeat this here. Here is the link if you want to revisit this:
As a programming language, I want to use Typescript this time. Doing this gives you a better insight into the multiple supported programming languages of Pulumi and how to use them.
We start by creating a new directory and initialising a new Pulumi project.
mkdir pulumi-aws-secretstore-csi
cd pulumi-aws-secretstore-csi
pulumi new aws-typescript --force
You can leave the default values in the prompt but maybe adjust the AWS region to your preference. I chose eu-central-1 as my region for this demo.
This command will walk you through creating a new Pulumi project.

Enter a value or leave blank to accept the (default), and press <ENTER>.
Press ^C at any time to quit.

project name: (pulumi-aws-secretstore-csi)
project description: (A minimal AWS JavaScript Pulumi program)
Created project 'pulumi-aws-secretstore-csi'

Please enter your desired stack name.
To create a stack in an organization, use the format <org-name>/<stack-name> (e.g. `acmecorp/dev`).
stack name: (dev)
Created stack 'dev'

aws:region: The AWS region to deploy into: (us-east-1) eu-central-1
Saved config

Installing dependencies...


added 169 packages, and audited 170 packages in 15s

54 packages are looking for funding
  run `npm fund` for details

found 0 vulnerabilities
Finished installing dependencies

Your new project is ready to go! ✨

To perform an initial deployment, run `pulumi up`
I will jump over the Pulumi code for the creation of the EKS cluster. I want to focus on the bits that are related to the Secret Store CSI Driver.
Here is the code for the creation of the AWS secret that we will use in the Secret Store CSI Driver.
const secret = new aws.secretsmanager.Secret("aws-sm", {
    name: "pulumi-secret-demo",
    description: "Pulumi Secret",
})


const secretVersion = new aws.secretsmanager.SecretVersion("aws-sv", {
    secretId: secret.id,
    secretString: `{"username":"hello", "password":"world"}`
})
So we are ready to start with the actual code. But let's talk about the way we're going to retrieve the secrets from AWS. To grant our pod access to the secrets in the AWS Secrets Manager, we need to create a permission policy that grants secretsmanager:GetSecretValue and secretsmanager:DescribeSecret permissions for the secret that the pod wants to access.
Then we need to create an IAM role for service accounts (IRSA) and attach the policy to the role.
The benefit of using IRSA is that you enforce the principle of least privilege (only pods with that service account can access the secrets). You have also credential isolation as the pod's containers can only retrieve the credentials for the IAM role that is associated with the service account that the container is using.
To enable IRSA, we need to create a new OIDC identity provider for the cluster. The OIDC issuer URL is retrieved from the EKS cluster. They mostly look like this: https://oidc.eks.<region>.amazonaws.com/id/<ID>.
Then we create the policy and the role. The role is annotated with the service account name and the namespace.
const fingerprint = getIssuerCAThumbprint(eks.identities[0].oidcs[0].issuer, new https.Agent({
        maxCachedSessions: 0
    }
))

new aws.iam.OpenIdConnectProvider("aws-eks-oidc-provider", {
    url: eks.identities[0].oidcs[0].issuer,
    clientIdLists: ["sts.amazonaws.com"],
    thumbprintLists: [fingerprint],
}, {dependsOn: eks})
After this, we are going to configure a Kubernetes service account to assume an IAM role. To this created IAM role we attach the policy mentioned above.
const current = aws.getCallerIdentity({});
export const accountId = current.then(current => current.accountId);

let oidcId = pulumi.interpolate`${eks.identities[0].oidcs[0].issuer}`.apply(id => {
    return id.replace("https://", "")
})

let trust = pulumi.interpolate`{
    "Version": "2012-10-17",
    "Statement": [
        {
            "Effect": "Allow",
            "Principal": {
                "Federated": "arn:aws:iam::${accountId}:oidc-provider/${oidcId}"
            },
            "Action": "sts:AssumeRoleWithWebIdentity",
            "Condition": {
                "StringEquals": {
                    "${oidcId}:sub": "system:serviceaccount:default:test",
                    "${oidcId}:aud": "sts.amazonaws.com"
                }
            }
        }
    ]
}`

const role = new aws.iam.Role("aws-secret-reader-role", {
    name: "secret-reader",
    assumeRolePolicy: trust,
})
const secretPolicyDocument = aws.iam.getPolicyDocumentOutput({
    version: "2012-10-17",
    statements: [
        {
            actions: [
                "secretsmanager:GetSecretValue",
                "secretsmanager:DescribeSecret",
            ],
            resources: [
                secret.id
            ],
            effect: "Allow",
        },
    ],
})

const secretPolicy = new aws.iam.Policy("aws-secret-policy", {
    policy: secretPolicyDocument.json,
})


new aws.iam.RolePolicyAttachment("aws-iam-rpa-6", {
    role: role.name,
    policyArn: pulumi.interpolate`arn:aws:iam::${accountId}:policy/${secretPolicy.name}`,
})
For this demo, the service account is created in the default namespace and is called test.
Now we can deploy the Secret Store CSI Driver. Following Pulumi code will deploy the Helm chart for the Secret Store CSI Driver and the AWS Secrets Manager provider.
const provider = new k8s.Provider("k8s-provider", {
    kubeconfig: kubeconfig,
    enableServerSideApply: true,
}, {dependsOn: [eks, nodeGroup]})

const csiStoreDriver = new k8s.helm.v3.Release("k8s-secrets-store-csi-driver", {
    chart: "secrets-store-csi-driver",
    namespace: "kube-system",
    repositoryOpts: {
        repo: "https://kubernetes-sigs.github.io/secrets-store-csi-driver/charts",
    }
}, {provider: provider})

new k8s.helm.v3.Release("k8s-secrets-store-csi-driver-provider-aws", {
    chart: "secrets-store-csi-driver-provider-aws",
    namespace: "kube-system",
    repositoryOpts: {
        repo: "https://aws.github.io/secrets-store-csi-driver-provider-aws",
    }
}, {provider: provider, dependsOn: [csiStoreDriver]})
Now we can create the Kubernetes service account that will be used by the pod to access the secret. Keep in mind, that we need to annotate the service account with the IAM role ARN that we created earlier.
new k8s.core.v1.ServiceAccount("k8s-sa", {
    metadata: {
        name: "test",
        namespace: "default",
        annotations: {
            "eks.amazonaws.com/role-arn": role.arn,
        }
    }
}, {provider: provider})
Before we can define the demo deployment, we need to create the SecretProviderClass resource. As provider we set aws and as parameters we need to specify the objects that we want to retrieve.
new k8s.apiextensions.CustomResource("k8s-cr", {
    apiVersion: "secrets-store.csi.x-k8s.io/v1",
    kind: "SecretProviderClass",
    metadata: {
        name: "aws-secret-provider",
        namespace: "default",
    },
    spec: {
        provider: "aws",
        parameters: {
            objects: pulumi.interpolate`- objectName: "${secret.arn}"
  objectType: "secretsmanager"
  objectAlias: "${secret.name}"`,
        }
    }
}, {provider: provider})
The demo deployment is a simple pod that mounts the secret as a volume. The volume is mounted to the path /mnt/secrets-store. I am using my hello-server image that is running a simple web server with several endpoints. We will use the /read endpoint to read the secret.
It's important to note that the serviceAccountName is set to test and the volume is using the SecretProviderClass we created earlier.
new k8s.apps.v1.Deployment("k8s-demo-deployment-authorized", {
    apiVersion: "apps/v1",
    kind: "Deployment",
    metadata: {
        name: "hello-server-deployment-authorized",
        labels: {
            app: "hello-server-authorized",
        },
        annotations: {
            "pulumi.com/skipAwait": "true",
        }
    },
    spec: {
        replicas: 1,
        selector: {
            matchLabels: {
                app: "hello-server-authorized",
            },
        },
        template: {
            metadata: {
                labels: {
                    app: "hello-server-authorized",
                },
            },
            spec: {
                serviceAccountName: "test",
                volumes: [{
                    name: "secrets-store-inline",
                    csi: {
                        driver: "secrets-store.csi.k8s.io",
                        readOnly: true,
                        volumeAttributes: {
                            secretProviderClass: "aws-secret-provider",
                        },
                    },
                }],
                containers: [{
                    name: "hello-server-authorized",
                    image: "ghcr.io/dirien/hello-server/hello-server:latest",
                    env: [{
                        name: "FILE",
                        value: pulumi.interpolate`/mnt/secrets-store/${secret.name}`,
                    }],
                    volumeMounts: [{
                        name: "secrets-store-inline",
                        mountPath: "/mnt/secrets-store",
                        readOnly: true,
                    }],
                }],
            },
        },
    },
}, {provider: provider});
I created also a deployment that is not using the service account and should not be able to access the secret.
Now we can run pulumi up and wait for the deployment of the whole stack. The deployment will take a few minutes.
pulumi up
When everything is deployed, we can continue to test the application.
In our Pulumi code I defined the variable kubeConfig that contains the kubeconfig for the EKS cluster.
export const kubeConfig = pulumi.secret(kubeconfig)
We can retrieve the kubeconfig with the following command.
pulumi stack output kubeConfig --show-secrets > kubeconfig.yaml
After we have the kubeconfig, we can use kubectl to access the cluster.
kubectl --kubeconfig kubeconfig.yaml get pods
NAME                                                    READY   STATUS              RESTARTS   AGE
hello-server-deployment-authorized-56748645d7-8jr7n     1/1     Running             0          3h6m
hello-server-deployment-unauthorized-545bf9db5f-gvsz7   0/1     ContainerCreating   0          49m
We can see that the pod that is using the service account is running and the pod that is not using the service account is stuck in ContainerCreating.
Describe the pod that is not using the service account.
kubectl --kubeconfig kubeconfig.yaml describe pod hello-server-deployment-unauthorized-545bf9db5f-gvsz7
And we can in the events that the pod is not able to mount the volume due to the missing IAM role.
Events:
  Type     Reason       Age                   From               Message
  ----     ------       ----                  ----               -------
  Normal   Scheduled    50m                   default-scheduler  Successfully assigned default/hello-server-deployment-unauthorized-545bf9db5f-gvsz7 to ip-10-0-58-9.eu-central-1.compute.internal
  Warning  FailedMount  19m (x23 over 50m)    kubelet            MountVolume.SetUp failed for volume "secrets-store-inline" : rpc error: code = Unknown desc = failed to mount secrets store objects for pod default/hello-server-deployment-unauthorized-545bf9db5f-gvsz7, err: rpc error: code = Unknown desc = eu-central-1: An IAM role must be associated with service account default (namespace: default)
Describe the pod that is using the service account.
kubectl --kubeconfig kubeconfig.yaml describe pod hello-server-deployment-authorized-56748645d7-8jr7n
We can see from the output, that the pod is running and the volume is mounted.
...
Volumes:
  aws-iam-token:
    Type:                    Projected (a volume that contains injected data from multiple sources)
    TokenExpirationSeconds:  86400
  secrets-store-inline:
    Type:              CSI (a Container Storage Interface (CSI) volume source)
    Driver:            secrets-store.csi.k8s.io
    FSType:
    ReadOnly:          true
    VolumeAttributes:      secretProviderClass=aws-secret-provider
  kube-api-access-w552f:
    Type:                    Projected (a volume that contains injected data from multiple sources)
    TokenExpirationSeconds:  3607
    ConfigMapName:           kube-root-ca.crt
    ConfigMapOptional:       <nil>
    DownwardAPI:             true
QoS Class:                   BestEffort
Node-Selectors:              <none>
Tolerations:                 node.kubernetes.io/not-ready:NoExecute op=Exists for 300s
                             node.kubernetes.io/unreachable:NoExecute op=Exists for 300s
Events:                      <none>
The final test is to use kubectl port-forward to access the application.
kubectl --kubeconfig kubeconfig.yaml port-forward hello-server-deployment-authorized-56748645d7-8jr7n 8080:8080
Forwarding from 127.0.0.1:8080 -> 8080
Forwarding from [::1]:8080 -> 8080
While the application is up and running, we can try to access the secret through the read endpoint.
curl localhost:8080/read
{"username":"hello", "password":"world"}%
Perfect! The application can read the secret from the volume as expected.
When we are done with the demo, we destroy our stack with the following command.
pulumi destroy
After the stack is destroyed, we can head over to use the Secret Store CSI Driver in Azure
Same language as before, but this time we will use Azure as our cloud provider. So let us create the Pulumi project with the following commands:
```bash
mkdir pulumi-azure-secretstore-csi
cd pulumi-azure-secretstore-csi
pulumi new azure-typescript  --force
You can leave the default values in the prompt but maybe adjust the Azure region to your preference. I chose westeurope as my region for this demo.
This command will walk you through creating a new Pulumi project.

Enter a value or leave blank to accept the (default), and press <ENTER>.
Press ^C at any time to quit.

project name: (pulumi-azure-secretstore-csi)
project description: (A minimal JavaScript Pulumi program with the native Azure provider)
Created project 'pulumi-azure-secretstore-csi'

Please enter your desired stack name.
To create a stack in an organization, use the format <org-name>/<stack-name> (e.g. `acmecorp/dev`).
stack name: (dev)
Created stack 'dev'

azure-native:location: The Azure location to use: (WestUS2) westeurope
Saved config

Installing dependencies...


added 147 packages, and audited 148 packages in 4m

51 packages are looking for funding
  run `npm fund` for details

found 0 vulnerabilities
Finished installing dependencies

Your new project is ready to go! ✨

To perform an initial deployment, run `pulumi up`
Before start configuring our Secret Store CSI Driver, we need to create a Key Vault and a secret. This is easy to do by using Pulumi. The secret I created, has the name secret and the value secret.
const vault = new keyvault.Vault("csi-driver-demo-vault", {
    location: resourceGroup.location,
    resourceGroupName: resourceGroup.name,
    vaultName: "csi-driver-demo-vault",
    properties: {
        accessPolicies: [
            {
                // we talk about this later
            }
        ],
        tenantId: pulumi.interpolate`${pulumi.output(config.tenantId).apply(tenantId => tenantId)}`,
        sku: {
            name: "standard",
            family: "A",
        },
    }
})

const secret = new keyvault.Secret("csi-driver-demo-secret", {
    resourceGroupName: resourceGroup.name,
    vaultName: vault.name,
    secretName: "secret",
    properties: {
        value: "secret",
    }
})
Now comes the fun part! We going to configure the Secret Store CSI Driver. Before we do so, we have to decide which Identity Access Mode we want to use. The Azure Secret Store CSI Driver supports the following modes:
Workload Identity
System-assigned Managed Identity
Service Principal
Pod Identity
For this demo, I will use the Workload Identity mode. To use this mode, we need to create a Kubernetes cluster where the OIDC issuer is enabled. This is not enabled by default. The Pulumi code for creating the cluster is as follows and you can see that I have enabled the oidcIssuerProfile option.
const aks = new containerservice.ManagedCluster("csi-driver-demo", {
    kubernetesVersion: "1.25.2",
    location: resourceGroup.location,
    resourceGroupName: resourceGroup.name,
    resourceName: "csi-driver-demo-aks",
    nodeResourceGroup: "csi-driver-demo-aks-nodes",
    dnsPrefix: resourceGroup.name,
    identity: {
        type: "SystemAssigned",
    },
    networkProfile: {
        networkPlugin: "azure",
        networkPolicy: "calico",
    },
    oidcIssuerProfile: {
        enabled: true,
    },
    agentPoolProfiles: [{
        name: "agentpool",
        count: 3,
        vmSize: "Standard_B2ms",
        osType: "Linux",
        osDiskSizeGB: 30,
        type: "VirtualMachineScaleSets",
        mode: "System",
    }],
});
With this setup, we can use the Workload Identity Federation, which is necessary for the Workload Identity mode.
We use workload identity federation to configure an Azure AD application registration or user-assigned managed identity to trust tokens from an identity provider (IdP). Once that trust relationship is created, your software workload can exchange trusted tokens from the external IdP for access tokens from Microsoft identity platform. Your software workload then uses that access token to access the Azure AD protected resources to which the workload has been granted access. This eliminates the maintenance burden of manually managing credentials and eliminates the risk of leaking secrets or having certificates expire.
When configuring the Workload Identity mode, we need to decide if we're going to use an Azure AD application or a user-assigned managed identity.
What is the difference between the two? When you turn on system-assigned managed identity for a resource, Azure creates a service principal in the background. This service principal is tied to the lifecycle of the resource. When the resource is deleted, so is the service principal.
Besides service principals, other objects in Azure AD can be used: User principals and applications. As the name implies, user principals are used for users while a service principal can be used to either represent a resource or an application object.
When you create an application registration two objects are created in Azure AD: an application object and a service principal. You could use this service principal access to different resources in Azure. This service principal is not tied to a particular resource.
I will use in my demo an application registration. Here is the code for creating the application and the service principal.
const app = new azuread.Application("csi-driver-demo-app", {
    displayName: "csi-driver-demo",

})

const enterpriseSP = new azuread.ServicePrincipal("csi-driver-demo-sp", {
    applicationId: app.applicationId,
})
After creating the application and the service principal, we need to create the application federation credentials. As mentioned before, this will establish a trust relationship between our Azure AD application and the Kubernetes workload.
As subject we define a Kubernetes service account called test in the default namespace. It's a demo after all! 😄
new azuread.ApplicationFederatedIdentityCredential("exampleApplicationFederatedIdentityCredential", {
    applicationObjectId: app.objectId,
    displayName: "kubernetes-federated-credential",
    description: "Kubernetes service account federated credential",
    audiences: ["api://AzureADTokenExchange"],
    issuer: pulumi.interpolate`${pulumi.output(aks.oidcIssuerProfile).apply(issuer => issuer?.issuerURL)}`,
    subject: "system:serviceaccount:default:test",
});
Last but not least, we need to fill out the access policies for the Key Vault. We need to give the service principal access to the secret in the Key Vault. Add the accessPolicies with only use the get permisson on secrets, keys and certificates.
...
accessPolicies: [
    {
        objectId: enterpriseSP.objectId,
        permissions: {
            secrets: ["get"],
            keys: ["get"],
            certificates: ["get"],
        },
        tenantId: pulumi.interpolate`${pulumi.output(config.tenantId).apply(tenantId => tenantId)}`,
    }
],
...
Similar to the AWS demo, we need to deploy the Secret Store CSI Driver for Azure. The Pulumi code for deploying the Helm chart is as follows.
const provider = new k8s.Provider("k8s-provider", {
    kubeconfig: kubeconfig,
    enableServerSideApply: true,
}, {dependsOn: [aks, app]})


new k8s.helm.v3.Release("csi-secrets-store-provider-azure", {
    chart: "csi-secrets-store-provider-azure",
    namespace: "kube-system",
    repositoryOpts: {
        repo: "https://azure.github.io/secrets-store-csi-driver-provider-azure/charts",
    }
}, {provider: provider, dependsOn: [vault]})
We then need to deploy our Kubernetes service account the workload identity was created for. The Pulumi code for doing this is similar to the AWS demo, with the exception that we do not need to add the annotations like we did in the AWS.
new k8s.core.v1.ServiceAccount("k8s-sa", {
    metadata: {
        name: "test",
        namespace: "default",
    }
}, {provider: provider})
Now we can deploy the SecretProviderClass resource. This time, we use for the provider the azure one. Additionally, we need to set the keyvaultName and the clientID to tenantId. The clientID is the objectId of the Azure AD application.
const secretProviderClass = new k8s.apiextensions.CustomResource("k8s-cr", {
    apiVersion: "secrets-store.csi.x-k8s.io/v1",
    kind: "SecretProviderClass",
    metadata: {
        name: "azure-secret-provider",
        namespace: "default",
    },
    spec: {
        provider: "azure",
        parameters: {
            keyvaultName: vault.name,
            clientID: app.applicationId,
            tenantId: pulumi.interpolate`${pulumi.output(config.tenantId).apply(tenantId => tenantId)}`,
            objects: pulumi.interpolate`array:
   - |
     objectName: "${secret.name}"
     objectType: "secret"`,
        }
    }
}, {provider: provider})
This part is the same as the AWS demo. Click here to see the code.
Wow, that was again a lot of parts to put together. Let's see if it works. Run pulumi up and wait for the deployment to finish.
pulumi up
We can now test the demo. We will retrieve the kubeConfig for the AKS cluster and use it to connect to the cluster.
pulumi stack output kubeConfig --show-secrets > kubeconfig.yaml
Check the state of our demo pods.
kubectl --kubeconfig kubeconfig.yaml get pods
NAME                                                    READY   STATUS              RESTARTS   AGE
hello-server-deployment-authorized-b684c7dff-p8xvf      1/1     Running             0          6m23s
hello-server-deployment-unauthorized-54567bffd5-f98nh   0/1     ContainerCreating   0          6m23s
As expected, the pod hello-server-deployment-unauthorized-54567bffd5-f98nh is not running. Describe the pod that is not using the test service account.
kubectl --kubeconfig kubeconfig.yaml describe pod hello-server-deployment-unauthorized-54567bffd5-f98nh
...
Events:
  Type     Reason       Age                    From               Message
  ----     ------       ----                   ----               -------
  Normal   Scheduled    8m11s                  default-scheduler  Successfully assigned default/hello-server-deployment-unauthorized-54567bffd5-f98nh to aks-agentpool-30414010-vmss000001
  Warning  FailedMount  7m55s (x6 over 8m11s)  kubelet            MountVolume.NewMounter initialization failed for volume "secrets-store-inline" : volume mode "Ephemeral" not supported by driver secrets-store.csi.k8s.io (no CSIDriver object)
  Warning  FailedMount  7m39s                  kubelet            MountVolume.SetUp failed for volume "secrets-store-inline" : rpc error: code = Unknown desc = failed to mount secrets store objects for pod default/hello-server-deployment-unauthorized-54567bffd5-f98nh, err: rpc error: code = Unknown desc = failed to mount objects, error: failed to get keyvault client: failed to get authorizer for keyvault client: failed to acquire token: FromAssertion(): http call(https://login.microsoftonline.com/3bb336c2-6605-4144-aa4b-b04b79bef215/oauth2/v2.0/token)(POST) error: reply status code was 400:
{"error":"invalid_request","error_description":"AADSTS70021: No matching federated identity record found for presented assertion. Assertion Issuer: 'https://westeurope.oic.prod-aks.azure.com/3bb336c2-6605-4144-aa4b-b04b79bef215/9a11d52e-7fd4-4548-bf71-d57a648f06ab/'. Assertion Subject: 'system:serviceaccount:default:default'. Assertion Audience: 'api://AzureADTokenExchange'. https://docs.microsoft.com/en-us/azure/active-directory/develop/workload-identity-federation\r\nTrace ID: 77e765d4-26fd-4802-9258-3a398ff75700\r\nCorrelation ID: 81e13db7-52ad-44f7-b933-598f4fad8fa9\r\nTimestamp: 2023-01-19 13:59:24Z","error_codes":[70021],"timestamp":"2023-01-19 13:59:24Z","trace_id":"77e765d4-26fd-4802-9258-3a398ff75700","correlation_id":"81e13db7-52ad-44f7-b933-598f4fad8fa9","error_uri":"https://login.microsoftonline.com/error?code=70021"}
We see that the default service account is not authorized to use the key vault.
If we describe the pod that is using the test service account, we see that the secret is mounted.
kubectl --kubeconfig kubeconfig.yaml describe pod hello-server-deployment-authorized-b684c7dff-p8xvf
We expect that the pod is running and that the secret is mounted.
Volumes:
  secrets-store-inline:
    Type:              CSI (a Container Storage Interface (CSI) volume source)
    Driver:            secrets-store.csi.k8s.io
    FSType:
    ReadOnly:          true
    VolumeAttributes:      secretProviderClass=azure-secret-provider
  kube-api-access-7s9rk:
    Type:                    Projected (a volume that contains injected data from multiple sources)
    TokenExpirationSeconds:  3607
    ConfigMapName:           kube-root-ca.crt
    ConfigMapOptional:       <nil>
    DownwardAPI:             true
QoS Class:                   BestEffort
Node-Selectors:              <none>
Tolerations:                 node.kubernetes.io/not-ready:NoExecute op=Exists for 300s
                             node.kubernetes.io/unreachable:NoExecute op=Exists for 300s
Events:
The last check is to use port-forwarding to access the read endpoint
kubectl --kubeconfig kubeconfig.yaml port-forward hello-server-deployment-authorized-b684c7dff-p8xvf 8080:8080
curl localhost:8080/read
secret%
Perfect, we can see that the secret is mounted and that we can read it.
Let us clean up the resources we created.
pulumi destroy
In this demo, I wanted to show how the default usage of the Secret Store CSI driver by mounting the secrets in a volume. You can also sync the secrets in a Kubernetes secret.
We also did not talk about how to rotate the secrets. The Secret Store CSI driver supports this feature.
If you are interested in these topics, let me know in the comments and I will write a follow-up article.
In this relatively large blog post, we saw how to use the Secrets Store CSI driver to mount secrets from Azure Key Vault or AWS Secrets Manager into a Kubernetes pod. The identification of the pod is done using the Azure Workload Identity or AWS IAM role for service accounts.
In comparison to the previous blog post, where we used the Bitnami Sealed Secrets, we can see that the Secrets Store CSI Driver is the right step forward. We benefit from managing the whole lifecycle of the secret in an enterprise-grade secret provider, while still having a Kubernetes-native way of mounting the secret into the pod.
Following the reasons to not use the Bitnami Sealed Secrets from this blog post
I can confirm all of them and I showed in this post the Reason #4: There are better solutions. with the Secrets Store CSI driver.
https://github.com/aws/secrets-store-csi-driver-provider-aws
https://docs.aws.amazon.com/eks/latest/userguide/iam-roles-for-service-accounts.html
https://azure.github.io/secrets-store-csi-driver-provider-azure/docs/
https://learn.microsoft.com/en-us/azure/aks/cluster-configuration#oidc-issuer
https://learn.microsoft.com/en-us/azure/active-directory/develop/workload-identity-federation
https://docs.aws.amazon.com/secretsmanager/latest/userguide/intro.html?icmpid=docs_asm_console