Advanced Secret Management on Kubernetes With Pulumi and GitOps: Sealed Secrets Controller
E
Cloud Native Pilgrim | Kubernetes Enthusiast | Serverless Believer | Customer Experience Architect @ Pulumi | (he/him) | CK{A,AD} |
Search for a command to run...
Cloud Native Pilgrim | Kubernetes Enthusiast | Serverless Believer | Customer Experience Architect @ Pulumi | (he/him) | CK{A,AD} |
Really Great Explanation! Worth reading it :D
TL;DR The code https://github.com/dirien/quick-bites/tree/main/pulumi-secretstore-csi-driver Introduction This article is part two of my series on how to manage secrets on Kubernetes with the help of Pulumi. In my first article, we talked about the...
GPU scheduling in Kubernetes has always felt like buying a mansion when you need a studio apartment. A small inference workload that needs 2GB of GPU memory gets scheduled on an entire 80GB A100, and there's nothing you can do about it. The device pl...

TL;DR: The code https://github.com/dirien/quick-bites Nothing is more controversial in the Kubernetes community than whether to use Helm or Kustomize. I always advocate the philosophy of using the right tool for the right job. It avoids the problem...

TL;DR Le code https://github.com/dirien/quick-bites Introduction This article is part three of my series on secret management on Kubernetes with the help of Pulumi. In my first article, we talked about the Sealed Secrets controller. The second arti...

With AWS Lambda

Disaster Recovery, Data Migration made easy!

This article is the start of a series of blog articles on how to manage secrets on Kubernetes with Pulumi and GitOps. We kick off with the Sealed Secrets controller, in my opinion, is one of the easiest ways to start managing your secrets on Kubernetes.
I will continue this series with other secret management tools, such as external-secrets, secrets-store-csi-driver and others.
Happy for any feedback and comments. So let's get started!
Sealed Secrets is an open-source project created by Bitnami Labs, that allows you to encrypt your secrets into a SealedSecret resource that can be safely stored in your Git repository. This can even be done in a public repository! The SealedSecret resource can then be decrypted by the Sealed Secrets controller. Seal Secrets supports different scopes to accommodate different ways of running your Kubernetes cluster:
strict: The default mode. The controller will only decrypt SealedSecrets that have been created with the same name and namespace during the sealing process. Failing this will lead to "decryption error" events.
namespace-wide: You can rename the SealedSecret resource after sealing it. The controller will decrypt it if the namespace matches.
cluster-wide: The SealedSecret resource can be renamed and moved to another namespace. The controller will decrypt it if the namespace matches.
We are going to use also one specific feature of Sealed Secrets: the ability to use a custom certificate to encrypt the secrets. Let Pulumi generate the certificate and store it in a Kubernetes Secret. The Sealed Secrets controller will then be initialized with this certificate. This allows us to use the same certificate to encrypt the secrets in all our clusters or generate a new certificate for each cluster.
To follow this article, you will need the following:
A Kubernetes cluster. I will use DigitalOcean Kubernetes (DOKS) for this article, but you can use any other Kubernetes cluster.
Pulumi CLI installed.
kubectl installed.
kubeseal installed.
optional K9s, if you want to quickly interact with your cluster.
Pulumi is an open-source infrastructure-as-code tool for creating, deploying and managing cloud infrastructure. Pulumi works with traditional infrastructures like VMs, networks, and databases and modern architectures, including containers, Kubernetes clusters, and serverless functions. Pulumi supports dozens of public, private, and hybrid cloud service providers.
Before we can start to deploy our infrastructure, we need to install the Pulumi CLI. This can be done either on your local development machine or your build agent. We cover the installation of the cli for some scenarios in the next section.
Pulumi stores metadata about your infrastructure so that it can manage your cloud resources and detect any changes between two deployments. This metadata is called state.
Pulumi stores its state in a backend of your choosing. There are two types of backends:
Service: a managed cloud experience using the online or self-hosted Pulumi Service application
Self-Managed: There is a wide range of self-managed backends available from AWS S3, Azure Blob Storage, Google Cloud Storage, and any AWS S3 compatible server to even your local filesystem.
Head over to Pulumi service to create your free SaaS backend. No need to handle state files.
You can install Pulumi through the Homebrew package manager and using the official Pulumi Homebrew Tap. Open a terminal and type the following command:
$ brew install pulumi/tap/pulumi
You can install Pulumi using elevated permissions through the Chocolatey package manager:
$ choco install pulumi
To install, run the installation script via the following command:
$curl -fsSL https://get.pulumi.com | sh
This will install the Pulumi CLI to ~/.pulumi/bin and add it to your path. If this command fails at automatically adding pulumi to your path, you will be prompted to add it manually.
Alternatively, we can install Pulumi manually. Pulumi provided a prebuilt binary for Linux.
Head over to the available versions page to choose the version of Pulumi you want to install.
Extract the tarball and move the binaries in the pulumi directory to a directory included in your system’s $PATH.
To verify that we have successfully installed pulumi, run the following command:
$ pulumi version
v3.50.2
Pulumi is a multi-language infrastructure as Code tool using imperative languages to create a declarative infrastructure description.
You have a wide range of programming languages available, and you can use the one you and your team are the most comfortable with. Currently, (11/2022) Pulumi supports the following languages:
Node.js (JavaScript / TypeScript)
Python
Go
Java
.NET (C#, VB, F#)
YAML
In this article, we will use Go as our programming language. You can of course use any other language supported by Pulumi.
Create a project folder (for example pulumi-argocd-sealedsecrets) and navigate into the newly created directory:
mkdir pulumi-argocd-sealedsecrets && cd pulumi-argocd-sealedsecrets
Create a new Pulumi program with the following command:
pulumi new go --force
You will be prompted to fill in some information about your project. You can leave the default values for now.
This command will walk you through creating a new Pulumi project.

Enter a value or leave blank to accept the (default), and press <ENTER>.
Press ^C at any time to quit.

project name: (pulumi-argocd-sealedsecrets)
project description: (A minimal Go Pulumi program)
Created project 'pulumi-argocd-sealedsecrets'

Please enter your desired stack name.
To create a stack in an organization, use the format <org-name>/<stack-name> (e.g. `acmecorp/dev`).
stack name: (dev)
Created stack 'dev'

Installing dependencies...

go: finding module for package github.com/mattn/go-isatty
go: found github.com/mattn/go-isatty in github.com/mattn/go-isatty v0.0.16
Finished installing dependencies

Your new project is ready to go! ✨

To perform an initial deployment, run `pulumi up`
To use the DigitalOcean provider, we need to install the pulumi-digitalocean provider. As we are using Go, we can type the following command:
go get github.com/pulumi/pulumi-digitalocean/sdk/v4/go/digitalocean
to add the provider package to our go.mod file. A quick go mod tidy and we are ready to go
The code for our infrastructure will be written in the main.go file. We will use the following code to create the cluster:
package main

import (
    "github.com/pulumi/pulumi-digitalocean/sdk/v4/go/digitalocean"
    "github.com/pulumi/pulumi/sdk/v3/go/pulumi"
)

func main() {
    pulumi.Run(func(ctx *pulumi.Context) error {

        digitalocean.NewKubernetesCluster(ctx, "pulumi-argocd-sealedsecrets", &digitalocean.KubernetesClusterArgs{
            Name:    pulumi.String("pulumi-argocd-sealedsecrets"),
            Region:  pulumi.String("fra1"),
            Version: pulumi.String("1.25.4-do.0"),
            NodePool: &digitalocean.KubernetesClusterNodePoolArgs{
                Name:      pulumi.String("pulumi-argocd-sealedsecrets"),
                NodeCount: pulumi.Int(1),
                Size:      pulumi.String("s-4vcpu-8gb"),
            },
        })

        return nil
    })
}
Just need to set the DIGITALOCEAN_TOKEN environment variable and we can create our infrastructure using the pulumi up command.
The output of the command will look like this:
Before we continue to deploy the Sealed Secrets controller, we too add two additional Pulumi providers to our project:
pulumi-kubernetes to deploy the Sealed Secrets controller via Helm
pulumi-tls to generate the TLS certificate for the Sealed Secrets controller
go get github.com/pulumi/pulumi-kubernetes/sdk/v3/go/kubernetes
go get github.com/pulumi/pulumi-tls/sdk/v4/go/tls
First, we need to create our TLS certificate. We will use the pulumi-tls provider to generate a private key and a self-signed certificate. The key created by the provider is a RSA key with a length of 4096 bits.
key, err := tls.NewPrivateKey(ctx, "pulumi-argocd-sealedsecrets", &tls.PrivateKeyArgs{
    Algorithm: pulumi.String("RSA"),
    RsaBits:   pulumi.Int(4096),
})
if err != nil {
    return err
}
selfSignedCert, err := tls.NewSelfSignedCert(ctx, "pulumi-argocd-sealedsecrets", &tls.SelfSignedCertArgs{
    Subject: &tls.SelfSignedCertSubjectArgs{
        CommonName:   pulumi.String("sealed-secret/"),
        Organization: pulumi.String("sealed-secret"),
    },
    PrivateKeyPem: key.PrivateKeyPem,
    AllowedUses: pulumi.StringArray{
        pulumi.String("cert_signing"),
    },
    ValidityPeriodHours: pulumi.Int(365 * 24),
})
if err != nil {
    return err
}
With the certificate created, we can prepare the deployment of the Sealed Secrets controller. First, we create a namespace for the Sealed Secrets controller and create a Secret resource containing the certificate and the private key. After that, we can deploy the Sealed Secrets controller using the Pulumi Helm resource.
  provider, err := kubernetes.NewProvider(ctx, "pulumi-argocd-sealedsecrets", &kubernetes.ProviderArgs{
              Kubeconfig: kubernetesCluster.KubeConfigs.ToKubernetesClusterKubeConfigArrayOutput().Index(pulumi.Int(0)).RawConfig(),
  })
  if err != nil {
      return err
  }
  namespace, err := v1.NewNamespace(ctx, "sealed-secrets", &v1.NamespaceArgs{
      Metadata: &metav1.ObjectMetaArgs{
          Name: pulumi.String("sealed-secrets"),
      },
  }, pulumi.Provider(provider))
  if err != nil {
      return err
  }
  secret, err := v1.NewSecret(ctx, "pulumi-argocd-sealedsecrets", &v1.SecretArgs{
      Metadata: &metav1.ObjectMetaArgs{
          Name:      pulumi.String("sealed-secret"),
          Namespace: namespace.Metadata.Namespace(),
          Labels: pulumi.StringMap{
              "sealedsecrets.bitnami.com/sealed-secrets-key": pulumi.String("active"),
          },
      },
      Type: pulumi.String("kubernetes.io/tls"),
      StringData: pulumi.StringMap{
          "tls.crt": selfSignedCert.CertPem,
          "tls.key": key.PrivateKeyPem,
      },
  }, pulumi.Provider(provider), pulumi.DependsOn([]pulumi.Resource{namespace}))
  if err != nil {
      return err
  }
  _, err = helmv3.NewRelease(ctx, "sealed-secrets", &helmv3.ReleaseArgs{
      Chart: pulumi.String("sealed-secrets"),
      RepositoryOpts: &helmv3.RepositoryOptsArgs{
          Repo: pulumi.String("https://charts.bitnami.com/bitnami"),
      },
      SkipAwait: pulumi.Bool(true),
      Namespace: namespace.Metadata.Namespace(),
      Version:   pulumi.String("1.2.1"),
  }, pulumi.Provider(provider), pulumi.DependsOn([]pulumi.Resource{namespace, secret}), pulumi.IgnoreChanges([]string{"values", "version"}))
  if err != nil {
      return err
  }
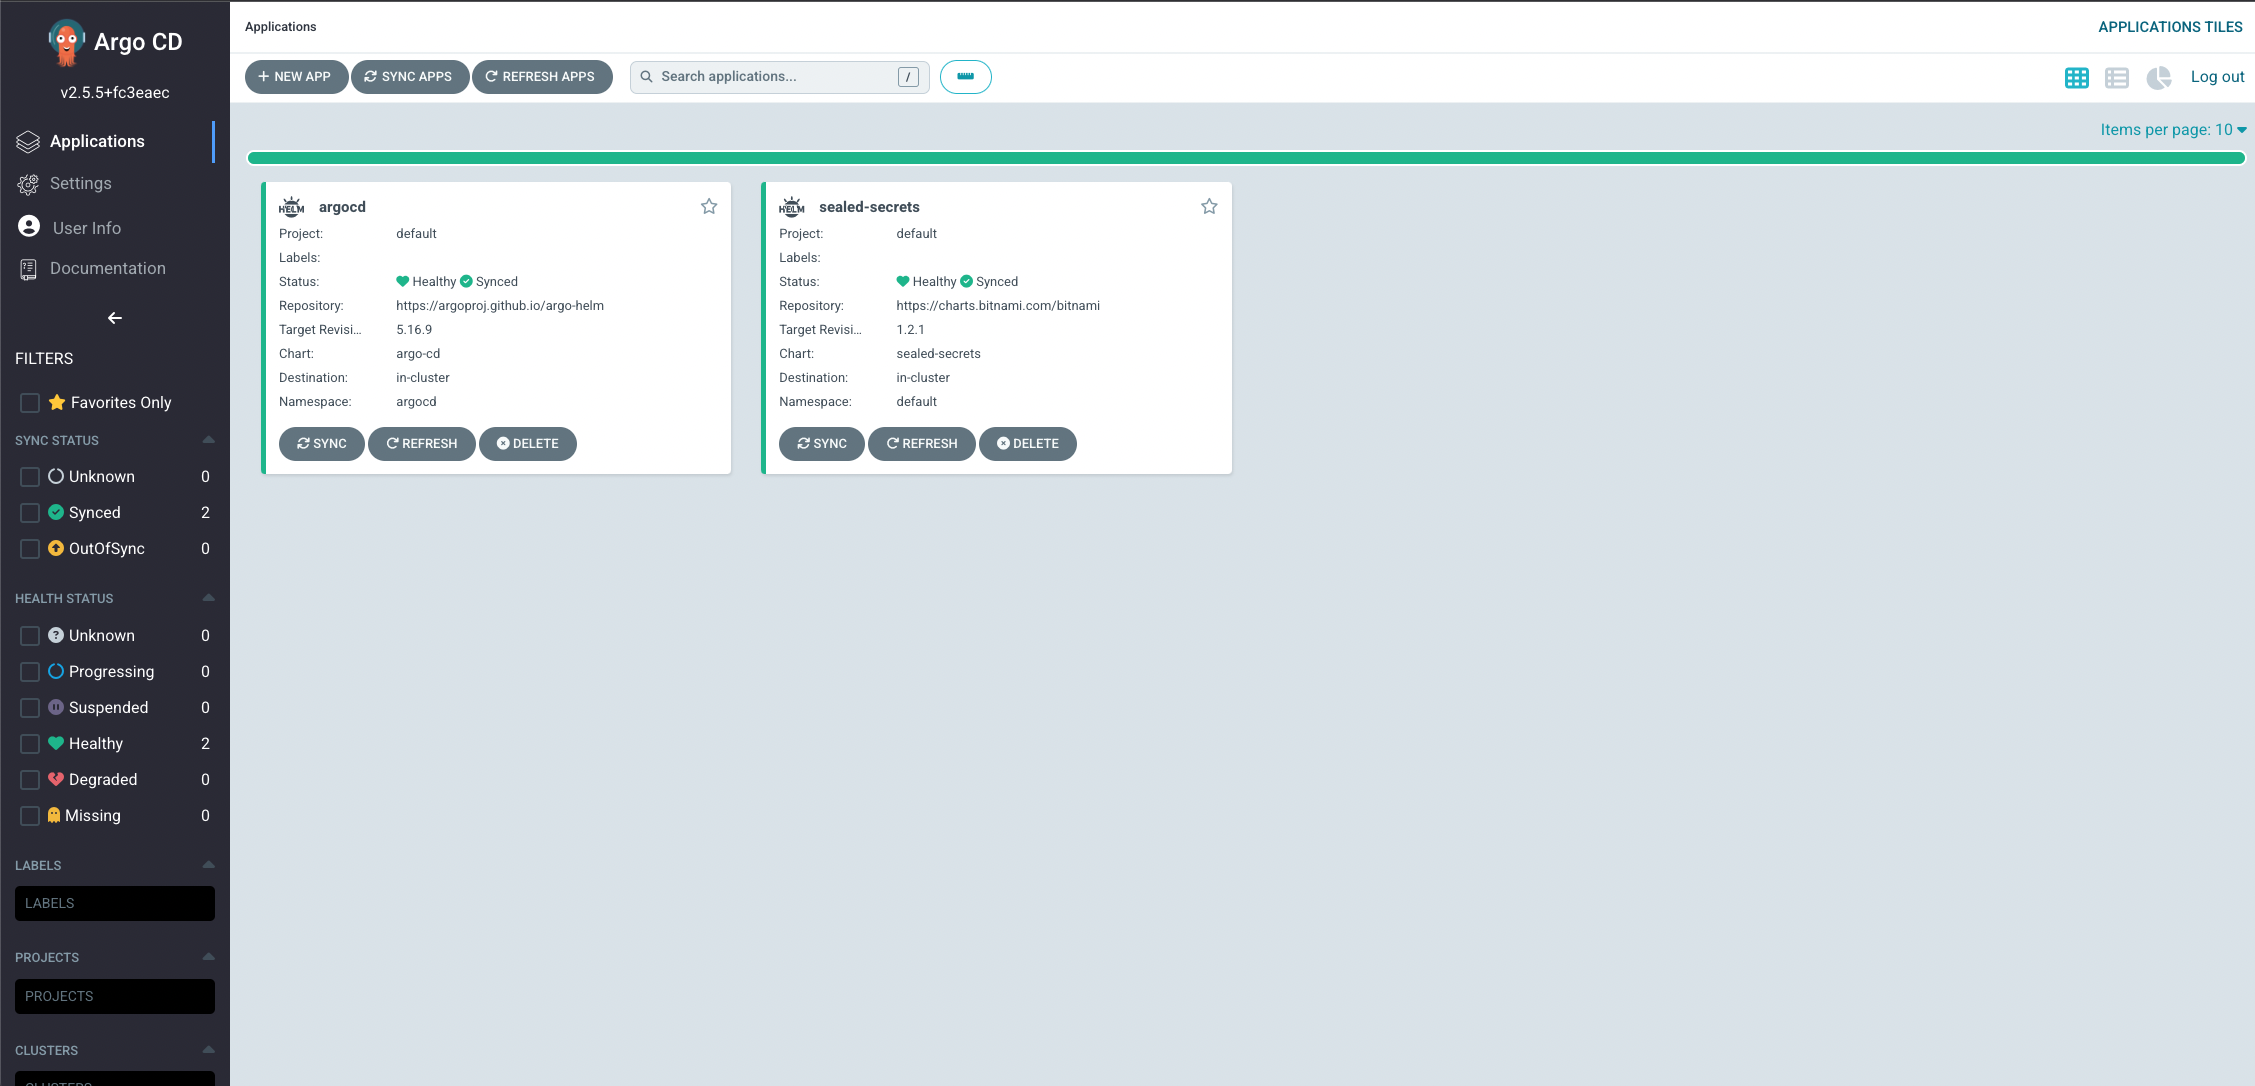
We can now deploy the Sealed Secrets controller using the pulumi up command.
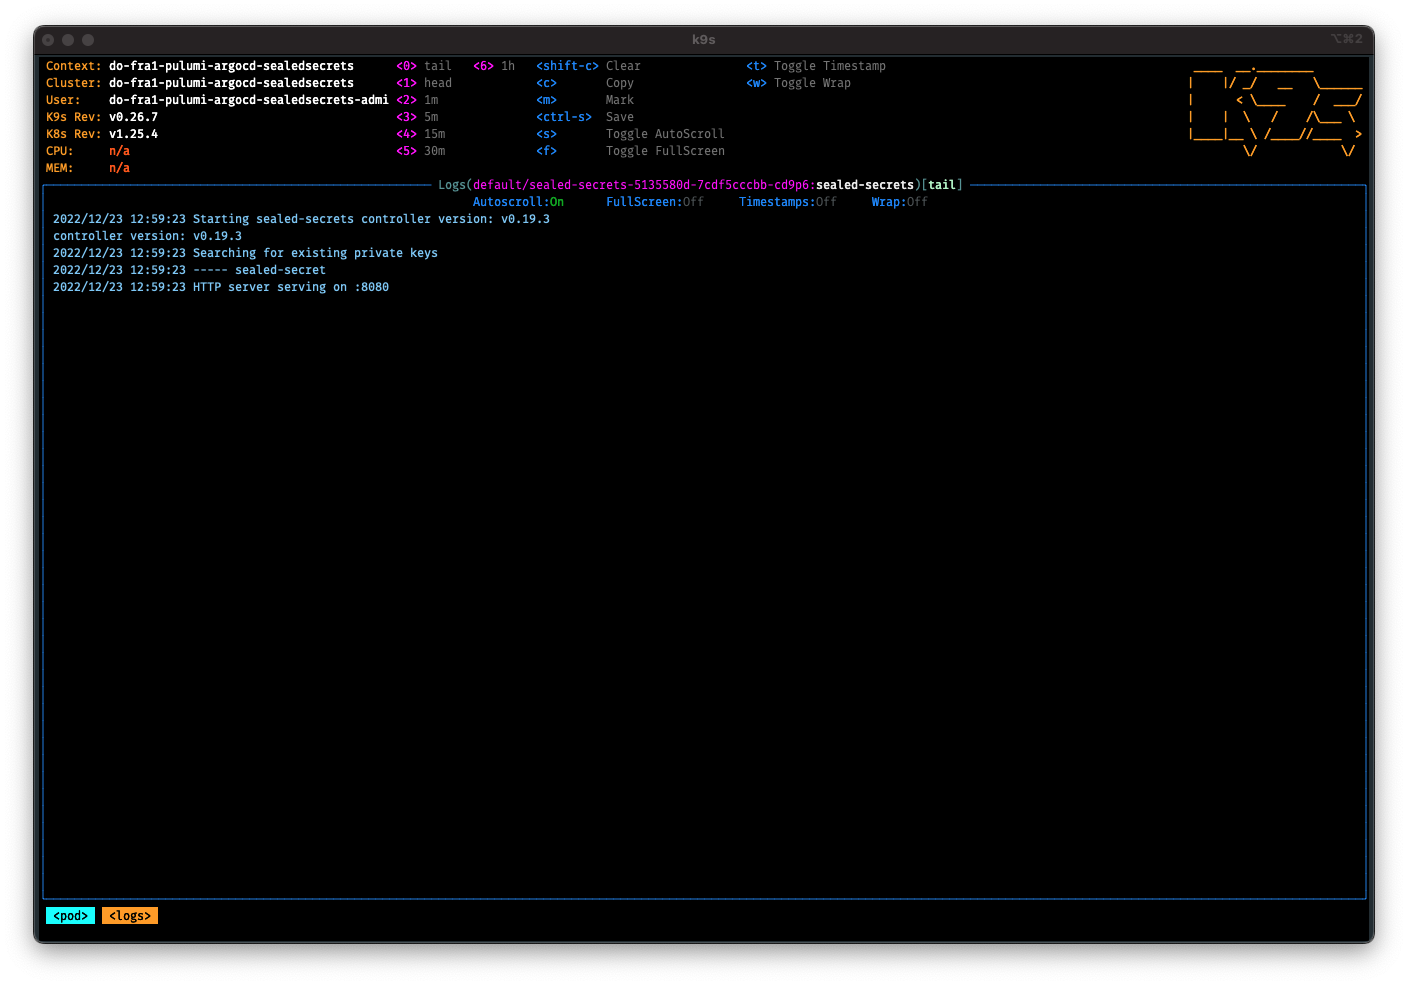
To check that everything went as plant, we grab the kubeconfig file for our cluster with the following command, to check the status of our cluster via kubectl or k9s
pulumi stack output kubeconfig --show-secrets -s dev > kubeconfig.yaml
When we check the logs of the Sealed Secrets controller, we should see that the controller is picking up the certificate and the private key.
kubectl logs sealed-secrets-89b65f958-s54sd
2022/12/23 12:59:23 Starting sealed-secrets controller version: v0.19.3
controller version: v0.19.3
2022/12/23 12:59:23 Searching for existing private keys
2022/12/23 12:59:23 ----- sealed-secret
2022/12/23 12:59:23 HTTP server serving on :8080
Or use the k9s to see the logs of the pod:
I am not going to go into detail about how to deploy ArgoCD, as there are plenty of resources out there that explain how to do it. I will just show you how to deploy ArgoCD using Pulumi.
Deploying ArgoCD is as simple as deploying the Sealed Secrets controller. We will create a new Pulumi Helm resource and deploy the ArgoCD chart.
  argoCD, err := helmv3.NewRelease(ctx, "argocd", &helmv3.ReleaseArgs{
      Name:  pulumi.String("argocd"),
      Chart: pulumi.String("argo-cd"),
      RepositoryOpts: &helmv3.RepositoryOptsArgs{
          Repo: pulumi.String("https://argoproj.github.io/argo-helm"),
      },
      SkipAwait:       pulumi.Bool(true),
      Namespace:       pulumi.String("argocd"),
      Version:         pulumi.String("5.16.9"),
      CreateNamespace: pulumi.Bool(true),
      Values: pulumi.Map{
          "server": pulumi.Map{
              "extraArgs": pulumi.Array{
                  pulumi.String("--insecure"),
              },
          },
      },
  }, pulumi.Provider(provider), pulumi.IgnoreChanges([]string{"values", "version"}))
We will add a little plot twist to the deployment! We will add two CR resources of the type Application to the mix, to let ArgoCD handle itself and the Sealed Secrets controller via GitOps. How cool is that?
_, err = apiextensions.NewCustomResource(ctx, "sealed-secrets-application", &apiextensions.CustomResourceArgs{
    ApiVersion: pulumi.String("argoproj.io/v1alpha1"),
    Kind:       pulumi.String("Application"),
    Metadata: &metav1.ObjectMetaArgs{
        Name:      pulumi.String("sealed-secrets"),
        Namespace: pulumi.String("argocd"),
    },
    OtherFields: kubernetes.UntypedArgs{
        "spec": pulumi.Map{
            "destination": pulumi.Map{
                "namespace": sealedSecretsRelease.Namespace,
                "name":      pulumi.String("in-cluster"),
            },
            "project": pulumi.String("default"),
            "source": pulumi.Map{
                "repoURL":        sealedSecretsRelease.RepositoryOpts.Repo(),
                "targetRevision": sealedSecretsRelease.Version,
                "chart":          sealedSecretsRelease.Chart,
            },
            "syncPolicy": pulumi.Map{
                "syncOptions": pulumi.Array{
                    pulumi.String("ServerSideApply=true"),
                },
                "automated": pulumi.Map{
                    "prune":    pulumi.Bool(true),
                    "selfHeal": pulumi.Bool(true),
                },
            },
        },
    },
}, pulumi.Provider(provider), pulumi.DependsOn([]pulumi.Resource{argoCD}))
if err != nil {
    return err
}
_, err = apiextensions.NewCustomResource(ctx, "argocd-application", &apiextensions.CustomResourceArgs{
    ApiVersion: pulumi.String("argoproj.io/v1alpha1"),
    Kind:       pulumi.String("Application"),
    Metadata: &metav1.ObjectMetaArgs{
        Name:      pulumi.String("argocd"),
        Namespace: argoCD.Namespace,
    },
    OtherFields: kubernetes.UntypedArgs{
        "spec": pulumi.Map{
            "destination": pulumi.Map{
                "namespace": argoCD.Namespace,
                "name":      pulumi.String("in-cluster"),
            },
            "project": pulumi.String("default"),
            "source": pulumi.Map{
                "repoURL":        argoCD.RepositoryOpts.Repo(),
                "targetRevision": argoCD.Version,
                "chart":          argoCD.Chart,
                "helm": pulumi.Map{
                    "values": pulumi.String(`server:
extraArgs:
- --insecure`),
                },
            },
            "syncPolicy": pulumi.Map{
                "syncOptions": pulumi.Array{
                    pulumi.String("ServerSideApply=true"),
                },
                "automated": pulumi.Map{
                    "prune":    pulumi.Bool(true),
                    "selfHeal": pulumi.Bool(true),
                },
            },
        },
    },
}, pulumi.Provider(provider), pulumi.DependsOn([]pulumi.Resource{argoCD}))
if err != nil {
    return err
}
Puh, that was a lot of code. But we are done, the whole infrastructure and services are deployed. We can head over to deploy our first application.
First, we need to create a SealedSecret resource that contains a simple secret. To do that, we will use the kubeseal command line tool.
To retrieve the PEM-encoded public key we need to add the following line of code to our Pulumi program:
ctx.Export("certPem", selfSignedCert.CertPem)
And then retrieve the value after the deployment is done and save it to a PEM file, which we can then use to seal the secret.
pulumi stack output certPem -s dev > cert.pem
Now we can create the Kubernetes secret and seal it using the public key. I set the scope of the sealed secret in the cli call to make it available to all namespaces.
kubectl create secret generic test --from-literal=TEST=PULUMI -o yaml --dry-run=client > secret.yaml
kubeseal --format yaml --cert cert.pem --scope cluster-wide < secret.yaml > sealed-secret.yaml
I created a small Git Repository with a simple deployment of a hello world application. I committed the sealed secret to the repository and pushed it to GitHub. Now we can deploy the application using ArgoCD.
You can find the repository here:
I add a new application CR to our Pulumi code.
_, err = apiextensions.NewCustomResource(ctx, "demo-application", &apiextensions.CustomResourceArgs{
    ApiVersion: pulumi.String("argoproj.io/v1alpha1"),
    Kind:       pulumi.String("Application"),
    Metadata: &metav1.ObjectMetaArgs{
        Name:      pulumi.String("demo-application"),
        Namespace: pulumi.String("argocd"),
    },
    OtherFields: kubernetes.UntypedArgs{
        "spec": pulumi.Map{
            "destination": pulumi.Map{
                "namespace": pulumi.String("default"),
                "name":      pulumi.String("in-cluster"),
            },
            "project": pulumi.String("default"),
            "source": pulumi.Map{
                "repoURL":        pulumi.String("https://github.com/dirien/very-very-simple-k8s-deployment"),
                "targetRevision": pulumi.String("HEAD"),
                "path":           pulumi.String("."),
            },
            "syncPolicy": pulumi.Map{
                "syncOptions": pulumi.Array{
                    pulumi.String("ServerSideApply=true"),
                },
                "automated": pulumi.Map{
                    "prune":    pulumi.Bool(true),
                    "selfHeal": pulumi.Bool(true),
                },
            },
        },
    },
}, pulumi.Provider(provider), pulumi.DependsOn([]pulumi.Resource{argoCD}))
if err != nil {
    return err
}
The good part is about GitOps, we can deploy the definitions now, even when we did not finish our application yet. ArgoCD will pull the repository and deploy the application. When we push a new commit to the repository, ArgoCD will sync the changes.
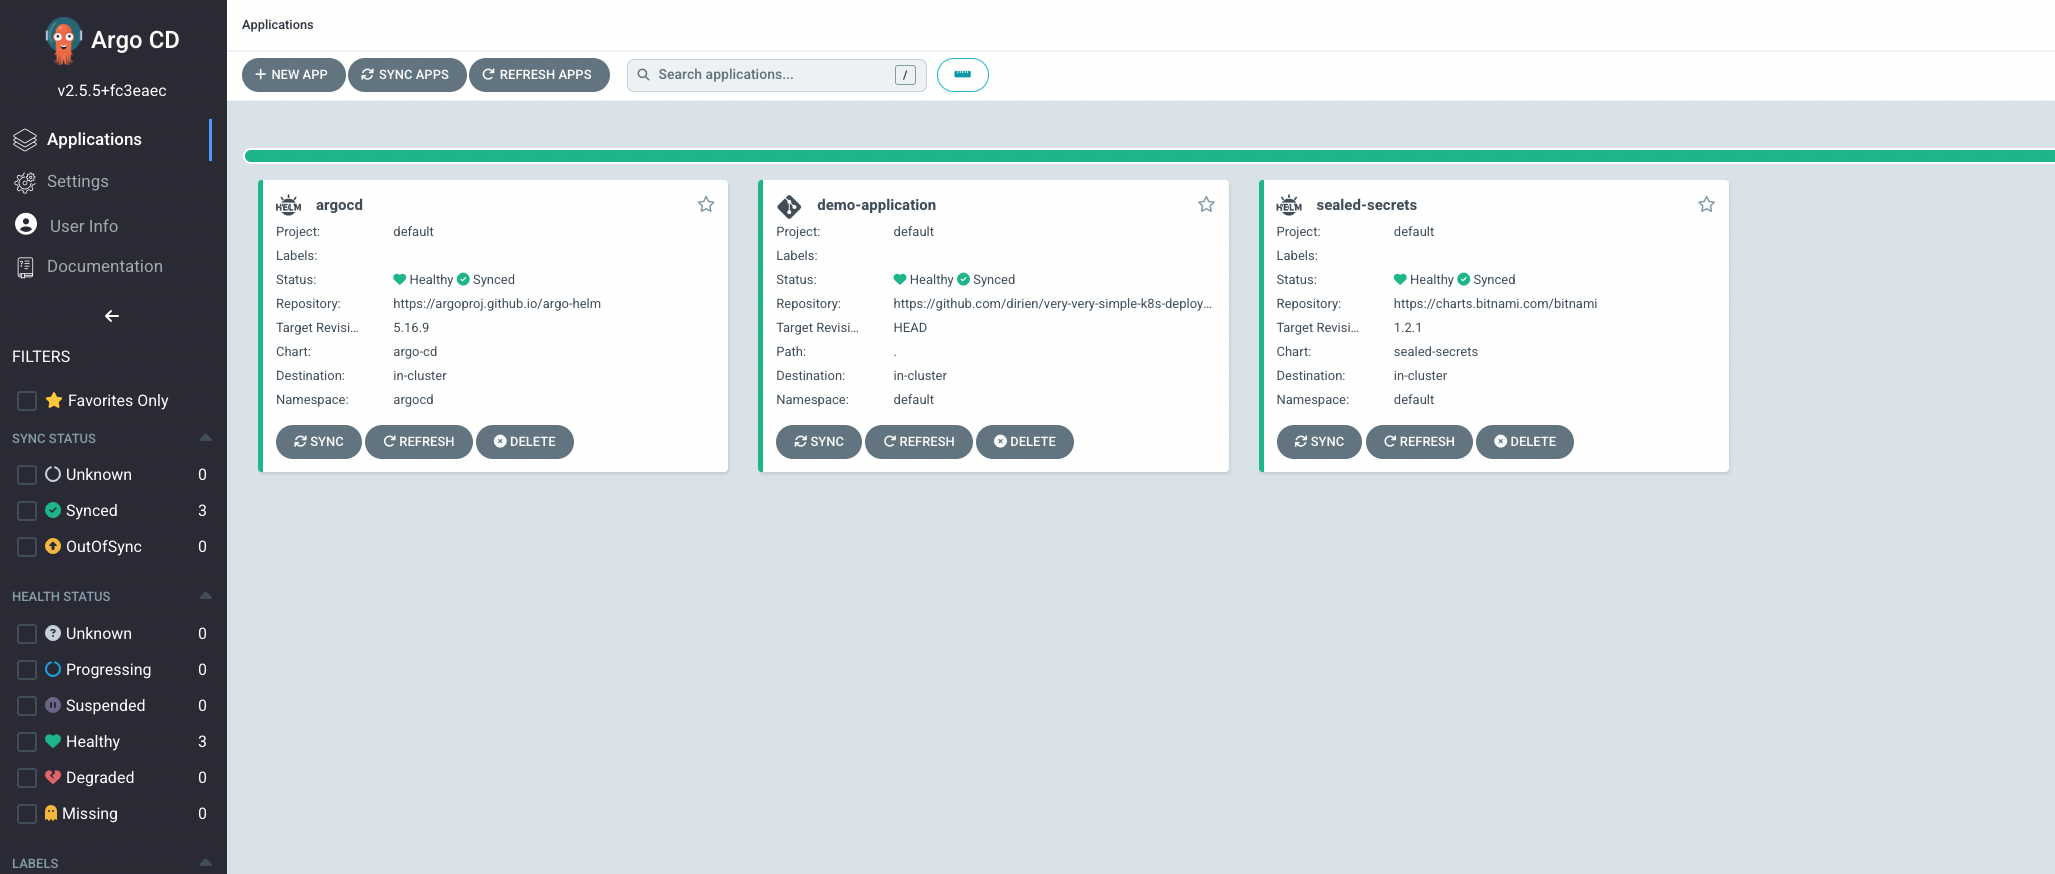
If everything went well, we should see the application deployed in the ArgoCD UI.
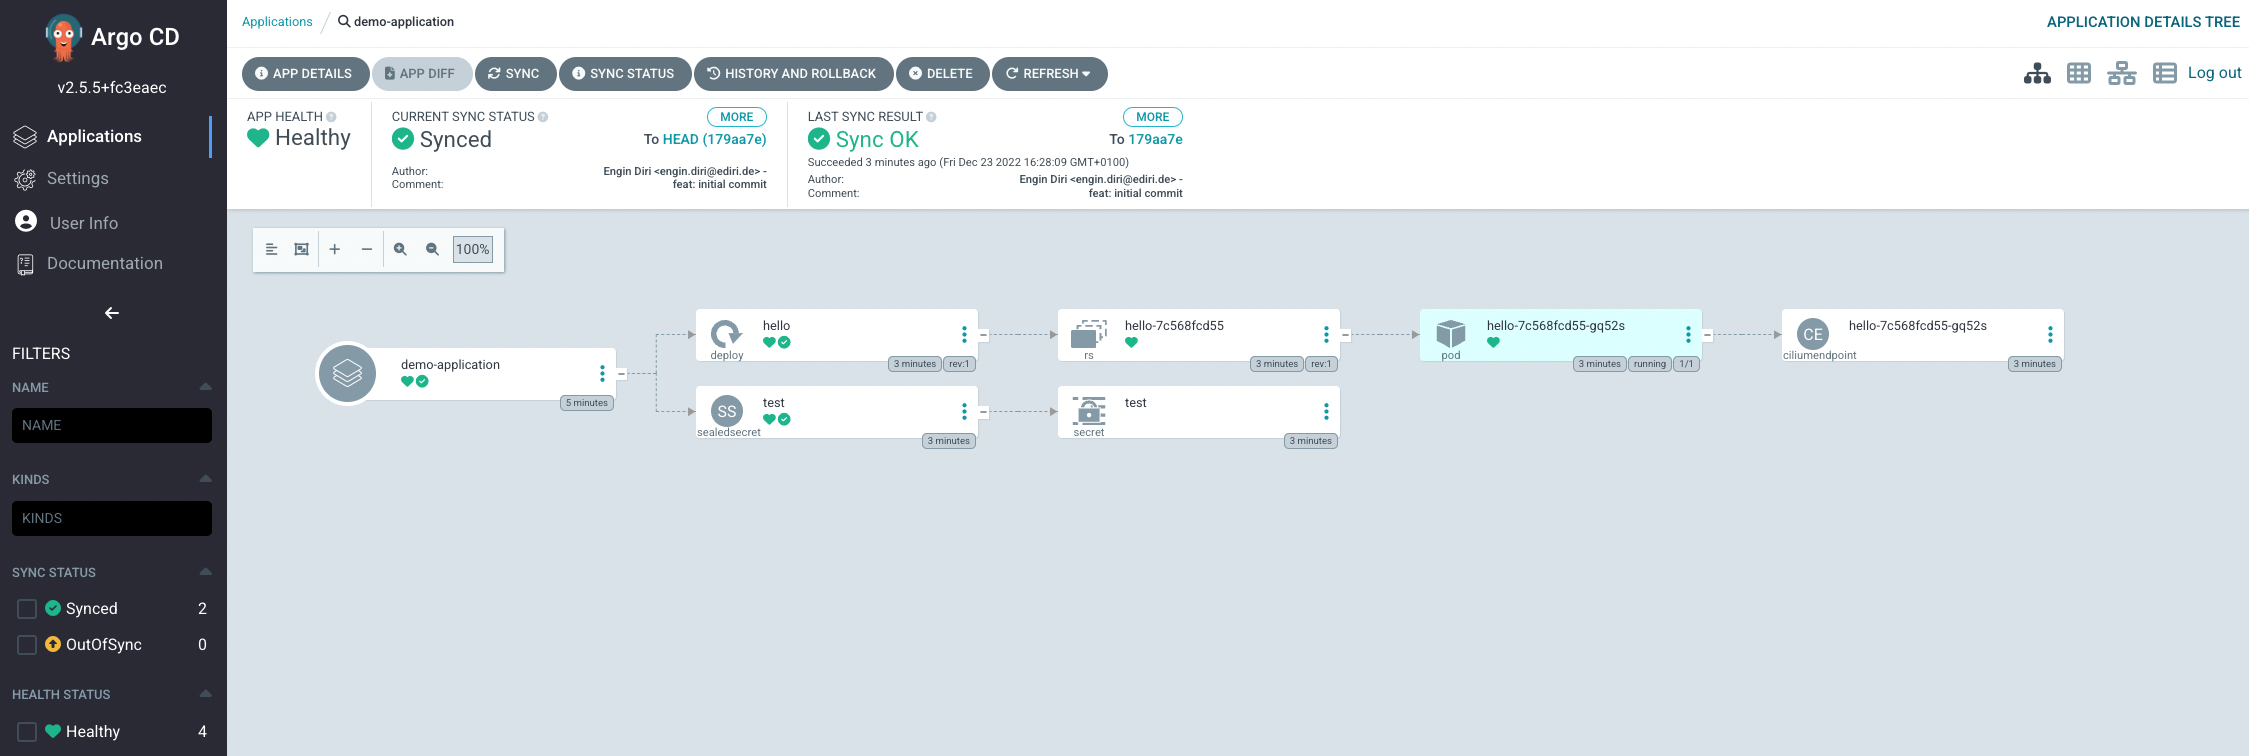
We can also check that our Sealed Secret was successfully decrypted, using following kubectl command:
kubectl describe sealedsecrets test

...
  Template:
    Metadata:
      Annotations:
        sealedsecrets.bitnami.com/cluster-wide:  true
      Creation Timestamp:                        <nil>
      Name:                                      test
Status:
  Conditions:
    Last Transition Time:  2022-12-23T15:28:09Z
    Last Update Time:      2022-12-23T15:28:09Z
    Status:                True
    Type:                  Synced
  Observed Generation:     1
Events:
  Type    Reason    Age                    From            Message
  ----    ------    ----                   ----            -------
  Normal  Unsealed  4m35s (x2 over 4m35s)  sealed-secrets  SealedSecret unsealed successfully
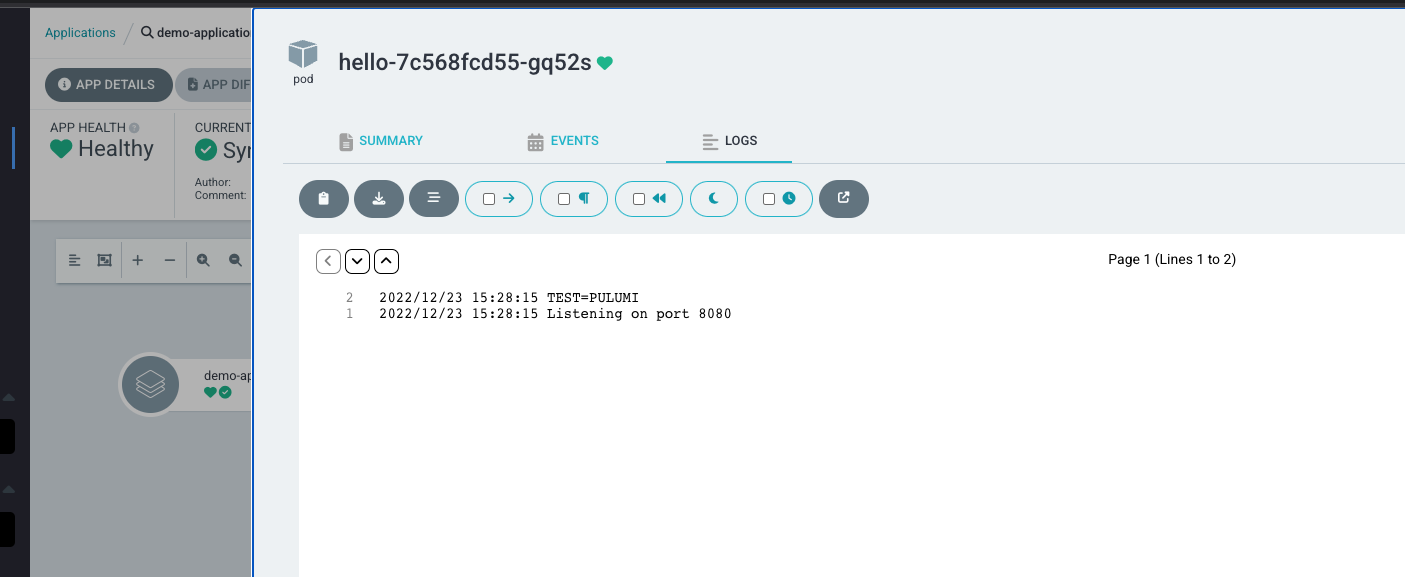
Yes! Perfect! Let's look into our demo application pod, to check that the secret is passed as an environment variable to the container:
kubectl logs hello-7c568fcd55-gq52s
2022/12/23 15:28:15 TEST=PULUMI
2022/12/23 15:28:15 Listening on port 8080
Or use the ArgoCD UI for this
Perfect! Now you can head over to housekeeping and destroy the cluster or head over to my conclusion.
We can now delete the stack and all resources that were created.
pulumi destroy
We saw how well Pulumi helps to bootstrap our Kubernetes platform and deploy the SealedSecrets controller with a self-signed certificate. After, we used Pulumi to deploy ArgoCD. The moment ArgoCD was deployed, we switched in Pulumi to a GitOps-only approach, and let ArgoCD take care of itself and the previously deployed SealedSecrets controller.
Adding some "tactical" pulumi.IgnoreChanges to the Pulumi Helm Release resource, helped us to switch to Application CR to then define any further changes in the Application CR. The good part is: this Application CR is managed by Pulumi but handled by ArgoCD all in Git!
Last we used the kubeseal command line tool to create a SealedSecret resource and added it to our Git repository. We then deployed the application using ArgoCD again creating a new Application CR in Pulumi.
If you have any questions or comments, please let me know in the comments below or reach out to me on Twitter.