


TL;DR
You like to read code more then some blog article? Here you go:
Introduction
In this tutorial I want to show, how easily you can write Kubernetes policies using JavaScript/Typescript with the help of jsPolicy.
As jsPolicy is an admission controllers, it makes absolutely sense to quickly recap the concepts of admission controllers in Kubernetes.
Admissions controllers
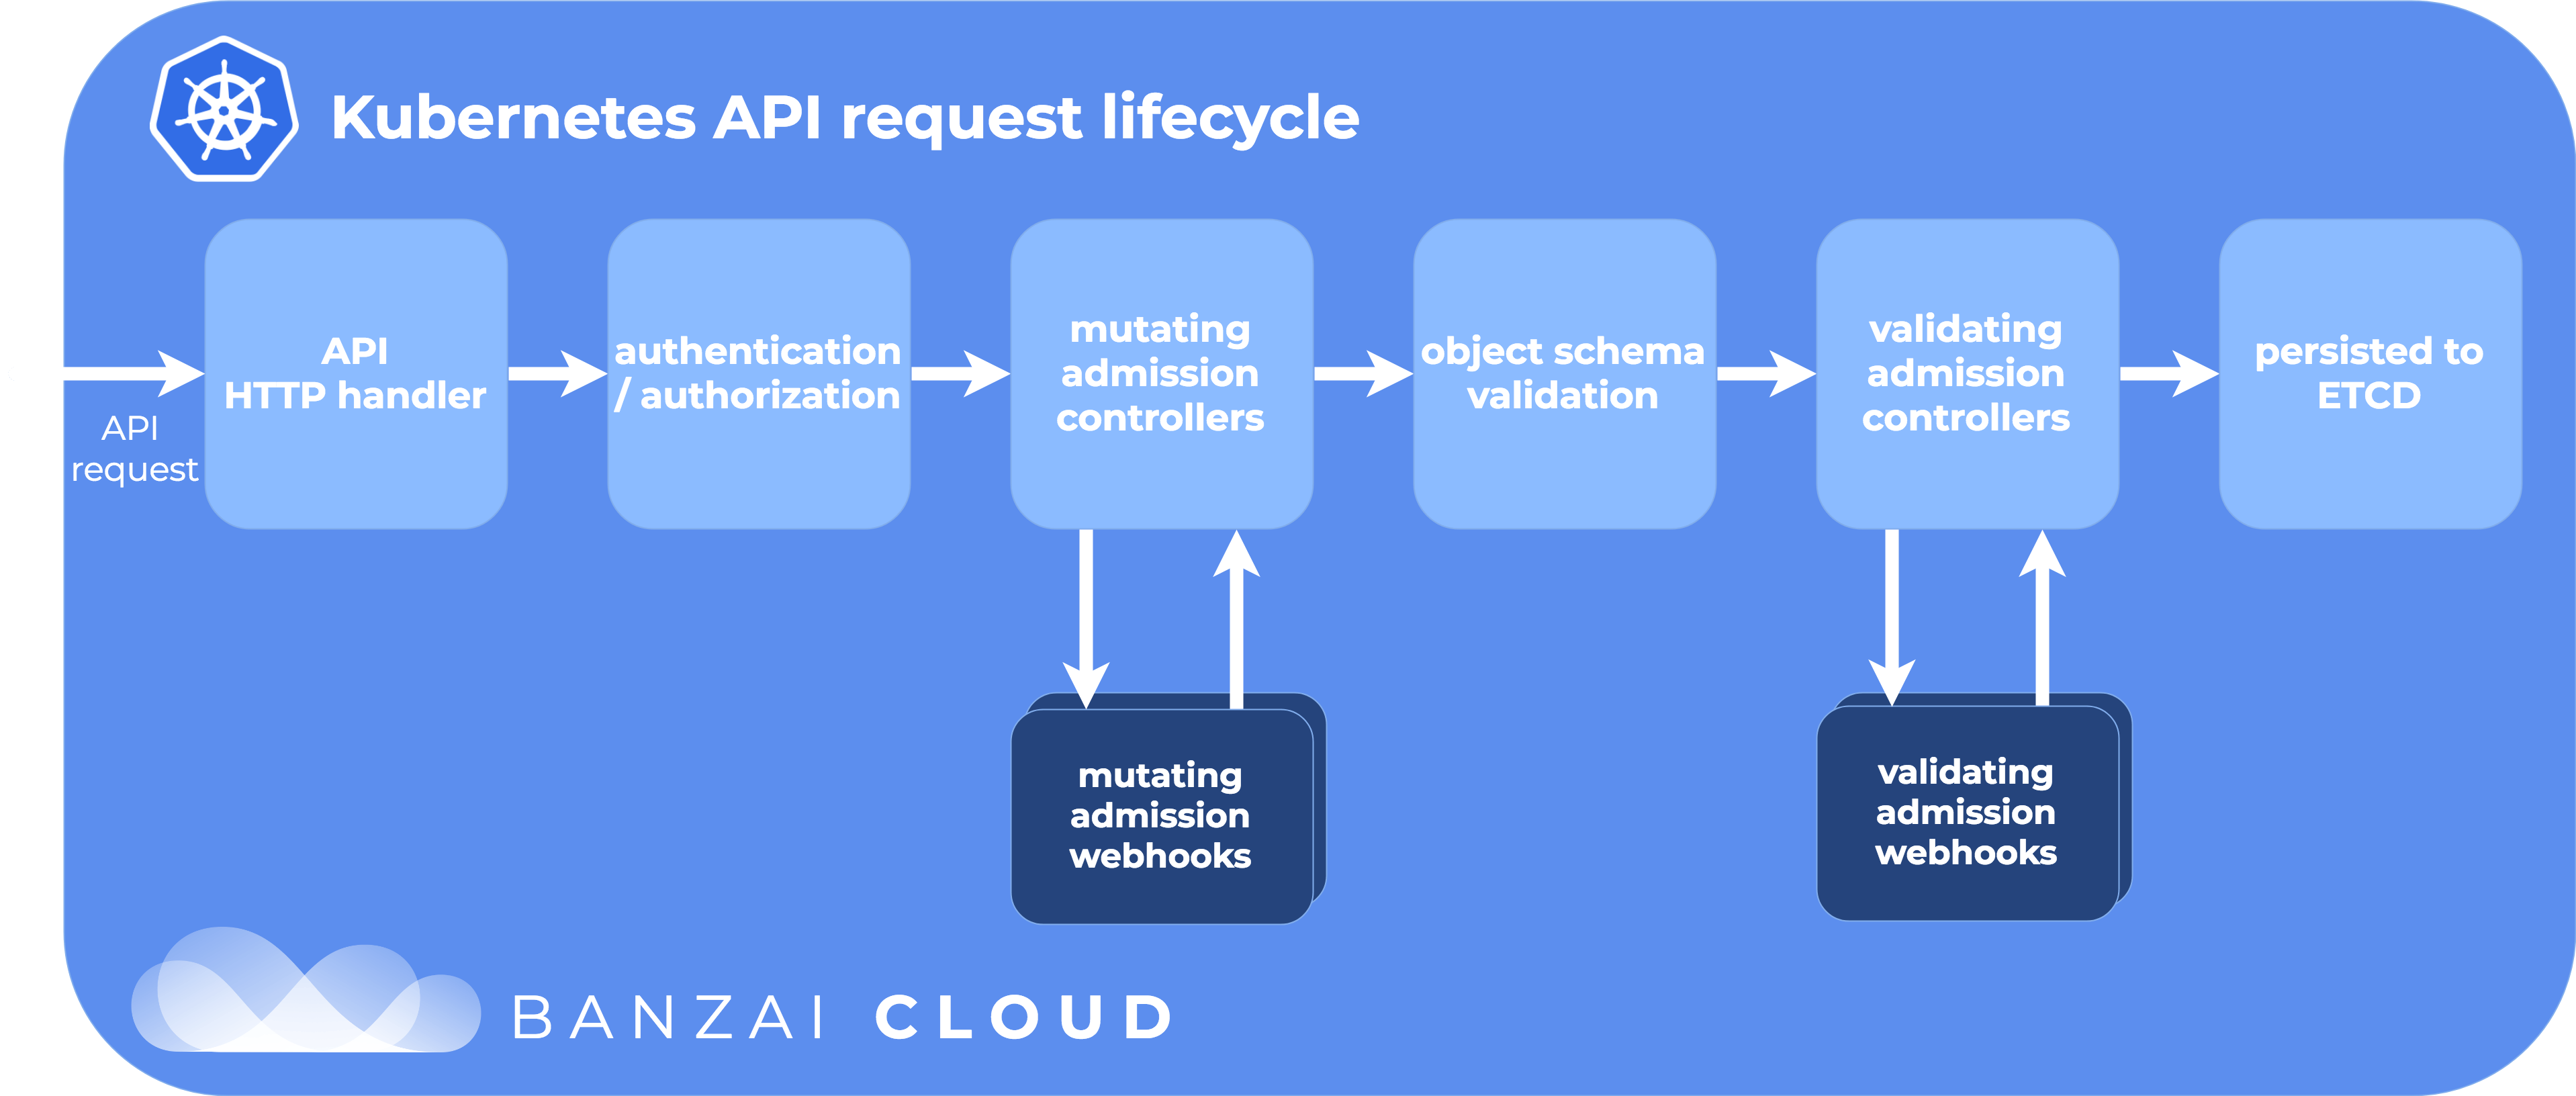
An admission controller is a piece of code that intercepts requests to the Kubernetes API server prior to persistence of the object, but after the request is authenticated and authorized.
Admission controllers can be:
- "validating"
- "mutating"
- both.
Mutating admission controllers may modify the object. Hence, the name "mutating". Validating admission controllers do not modify the object.
Admission controllers interaction with the API is limited to following operations:
- create (CREATE)
- delete (DELETE)
- modify objects (UPDATE)
- connect to proxy. (CONNECT)
There is no limit on read operations.
The admission control process proceeds in two phases:
First the mutating admission controllers run. Then in the second phase the validating admission controllers kick in.
It is important to note that when admission controllers reject a request, the entire request is rejected immediately. The user will get a response with the reason why the request was rejected.
jsPolicy
Introduction
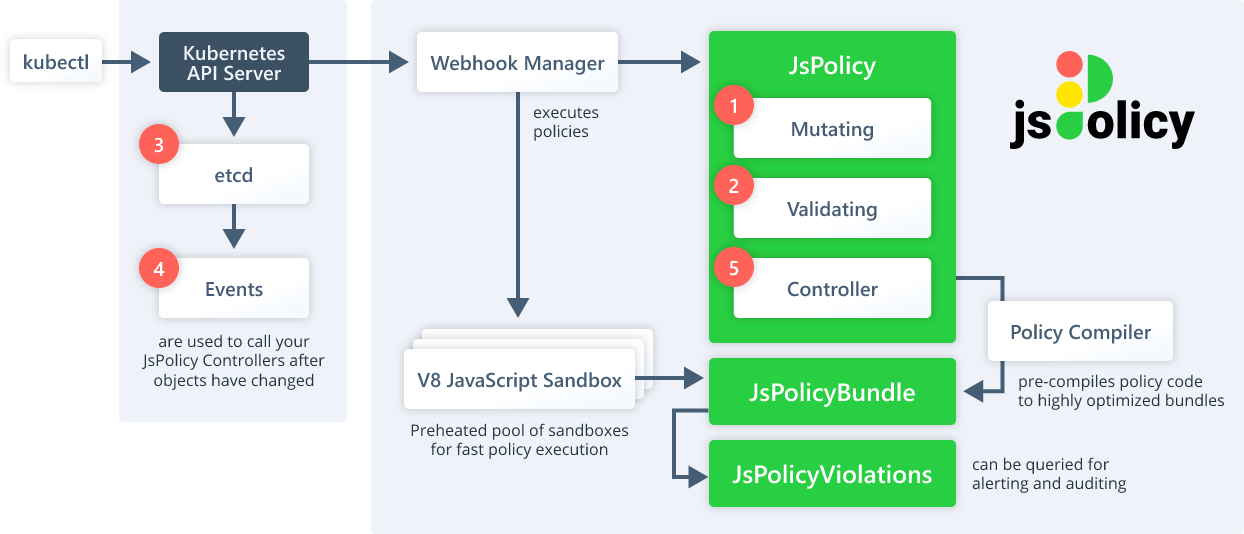
jsPolicy is a policy engine for Kubernetes that allows you to write policies in JavaScript or TypeScript. jsPolicy runs policies with Google's V8 JavaScript engine in a pool of pre-heated sandbox environments. This makes the execution of a policy amazing fast.
Policy Types
jsPolicy supports the following three policy types:
Validating Policies
Request validation, where you can calling allow(), deny("Nope, not gonna make it"), or warn("I just telling you, that will not go well for long").
Mutating Policies
Simple mutations of the kubectl request payload. With this, you can enforce the "look and feel" of your workloads. You need to add a label, remove a podsecurity, update a sidecar version, etc. all possible via mutating policies.
Controller Policies
Run custom JavaScript controllers that react to any changes to the objects in your cluster (controller policies are reactive, so they are not webhooks and part of a Kubernetes API server request but instead react to Events in your cluster after they have happened). With controller policies you can write resource sync mechanisms, enforce objects in namespaces, garbage collectors or fully functional CRD controllers
Writing Policies
When writing policies for jsPolicy you need to keep following configuration in mind:
All relevant settings for policies are stored inside the JsPolicy custom resource and there are three types of options:
- Policy Type: You can choose between Validating, Mutating, or Controller
- Policy Trigger: defines for which kind of operations and objects the policy should be executed
- Runtime Settings: define additional parameters that matter during the execution of the policy logic.
apiVersion: policy.jspolicy.com/v1beta1
kind: JsPolicy
metadata:
  name: mutate-namespaces.ediri.io
spec:
  operations: [
    CREATE
  ]
  resources: [
    namespaces
  ]
  type: Mutating
Use the spec.javascript option of the JsPolicy CRD to write policy code inline as embedded JavaScript ES5 (vanilla
JS):
apiVersion: policy.jspolicy.com/v1beta1
kind: JsPolicy
metadata:
  name: "deny-default-namespace.company.tld"
spec:
  operations: [ "CREATE" ]
  resources: [ "*" ]
  scope: Namespaced
  javascript: |
    if (request.namespace === "default") {
      deny("Creation of resources within the default namespace is not allowed!");
    }
Of course, you can also use a separate JavaScript project to build, test and deploy your policies. Actually any language that can get cross-compiled to Javascript is supported.
This is actually the way, I did in this tutorial. Under der folder policies, you will find a the different policies that I wrote.
Under the src folder, I created three different folders: lib, policies and utlis. In the lib folder, I created the main logic of the policies and exported the function, so that different policies can use it.
In the policies folder, I created the different policies, sorted by the K8s resource they apply to and the operation.
So mutate-namespaces is a policy that mutates the namespace of a namespace creation request.
import {V1Namespace} from "@kubernetes/client-node";
import {addLabelToMetaData} from "../../lib";
import {formatYmd} from "../../util/helper";


let namespace = request?.object as V1Namespace

//addLabelToMetaData(namespace, "created-by", request.userInfo.username || "unknown")
addLabelToMetaData(namespace, "created-on", formatYmd(new Date()))
addLabelToMetaData(namespace, "appcode", "ISO1234")
addLabelToMetaData(namespace, "name", namespace.metadata?.name!)

mutate(namespace);
The util folder contains helper functions that are used by the policies.
On advantage of this, is that you can write better tests for your policies, when you seperate the logic. So in the tests folder, I created via jest the tests for the policies.
...
describe("Test mutating the metadata.labels", () => {
  test("Check containers", () => {
    const testNamespace: V1Namespace = {
      metadata: {
        name: "test-pod",
      }
    }

    const expectNamespace: V1Namespace = {
      metadata: {
        name: "test-pod",
        labels: {
          "kubernetes.io/metadata.name": "test-pod"
        }
      }
    }
    expect(addLabelToMetaData(testNamespace, "kubernetes.io/metadata.name", "test-pod")).toEqual(expectNamespace);
  });
});
...
With the npm command npm run compile-clean, you can compile the policies and run the tests. The output of the compiled yaml files is defined in the webpacl.config.js file and in my case it will be stored in the ../deploy/policies folder.
Before we head over to the demo, I highly recommend you read the jsPolicy documentation for more information about jsPolicy.
The Demo
In this demo, I am going to deploy the Weaveworks Sock Shop application via the Flux Bucket component. But before the application deployment, jsPolicy will be deployed. So we can be sure, that the policies will be availalAnd all via GitOps using Flux! How awesome is that?
As a cloud provider, I choose to use Google GKE and the GCS bucket to store the deployment artifacts.
Everything will be deployed, as usual, via infrastructure as code using Pulumi. And I am going to use TypeScript for the whole deployment.
Prerequisites
The
FluxCLI should be installed on your machine. See the Flux CLI installationYou need to have an account at GCP, head over here to create an account if needed.
The
PulumiCLI should be present on your machine. InstallingPulumiis easy, just head over to the get-stated website and chose the appropriate version and way to download the cli. To store your state files, you can use their free SaaS offering
Infrastructure Deployment
In the folder infrastructure, I created two different Pulumi stacks. One for the cloud provider and one for deploying the Flux components, including the Bucket component.
I use the google-native-typescript Pulumi template, when I created the stack:
pulumi new google-native-typescript
The rest of the deployment is similar to my previous tutorial, but just using the Google cloud provider.
Click here:
Only thing that is worth mentioning is the way I had to build my kubeconfig file. I had to build file from a template and use some output variables from the Pulumi stack rendered into the file.
...
const kubeConfig = pulumi.all([gke.name, gke.endpoint, gke.masterAuth, token]).apply(
    ([name, endpoint, auth, token]) => {
      const context = `${project}_${name}`;
      return `apiVersion: v1
clusters:
- cluster:
    certificate-authority-data: ${auth.clusterCaCertificate}
    server: https://${endpoint}
  name: ${context}
contexts:
- context:
    cluster: ${context}
    user: "admin"
  name: ${context}
current-context: ${context}
kind: Config
preferences: {}
users:
- name: "admin"
  user:
    token: ${token.accessToken}
`;
    });
...
To ease the deployment, I use a Makefile to deploy both stack. I am not that good at writing Makefiles, so don't be too hard on me!
With the following command, and a couple of minutes of wait time to provision the resources you should be finished with the first part of the demo.
make bootstrap
To be sure, we deploy the application only after the jspolicy stack is deployed I use the healthcheck attribute in the Kustomization resource of flux.
Flux call this health assessment, and a Kustomization can contain a series of health checks used to determine the rollout status of the deployed workloads and the ready status of custom resources.
...
healthChecks: [
  {
    apiVersion: "apps/v1",
    kind: "Deployment",
    name: "jspolicy",
    namespace: "jspolicy",
  }
],
...
And if everything is fine, you should see the following you can now deploy the manifest to the GCS bucket via the make command:
make upload-gcp
Maybe you need to reconcile the bucket, if you want to start the deployment immediately.
make reconcile-bucket
To see if the polices are working, we can now check the sock shop namespace resources.
apiVersion: v1
kind: Namespace
metadata:
  creationTimestamp: "2022-05-21T11:47:08Z"
  labels:
    appcode: ISO1234
    created-on: "2022-05-21"
    kubernetes.io/metadata.name: sock-shop
    name: sock-shop
  name: sock-shop
  resourceVersion: "28452"
  uid: 0149ff8e-62b2-48e0-9316-e990d01b6a67
spec:
  finalizers:
  - kubernetes
...
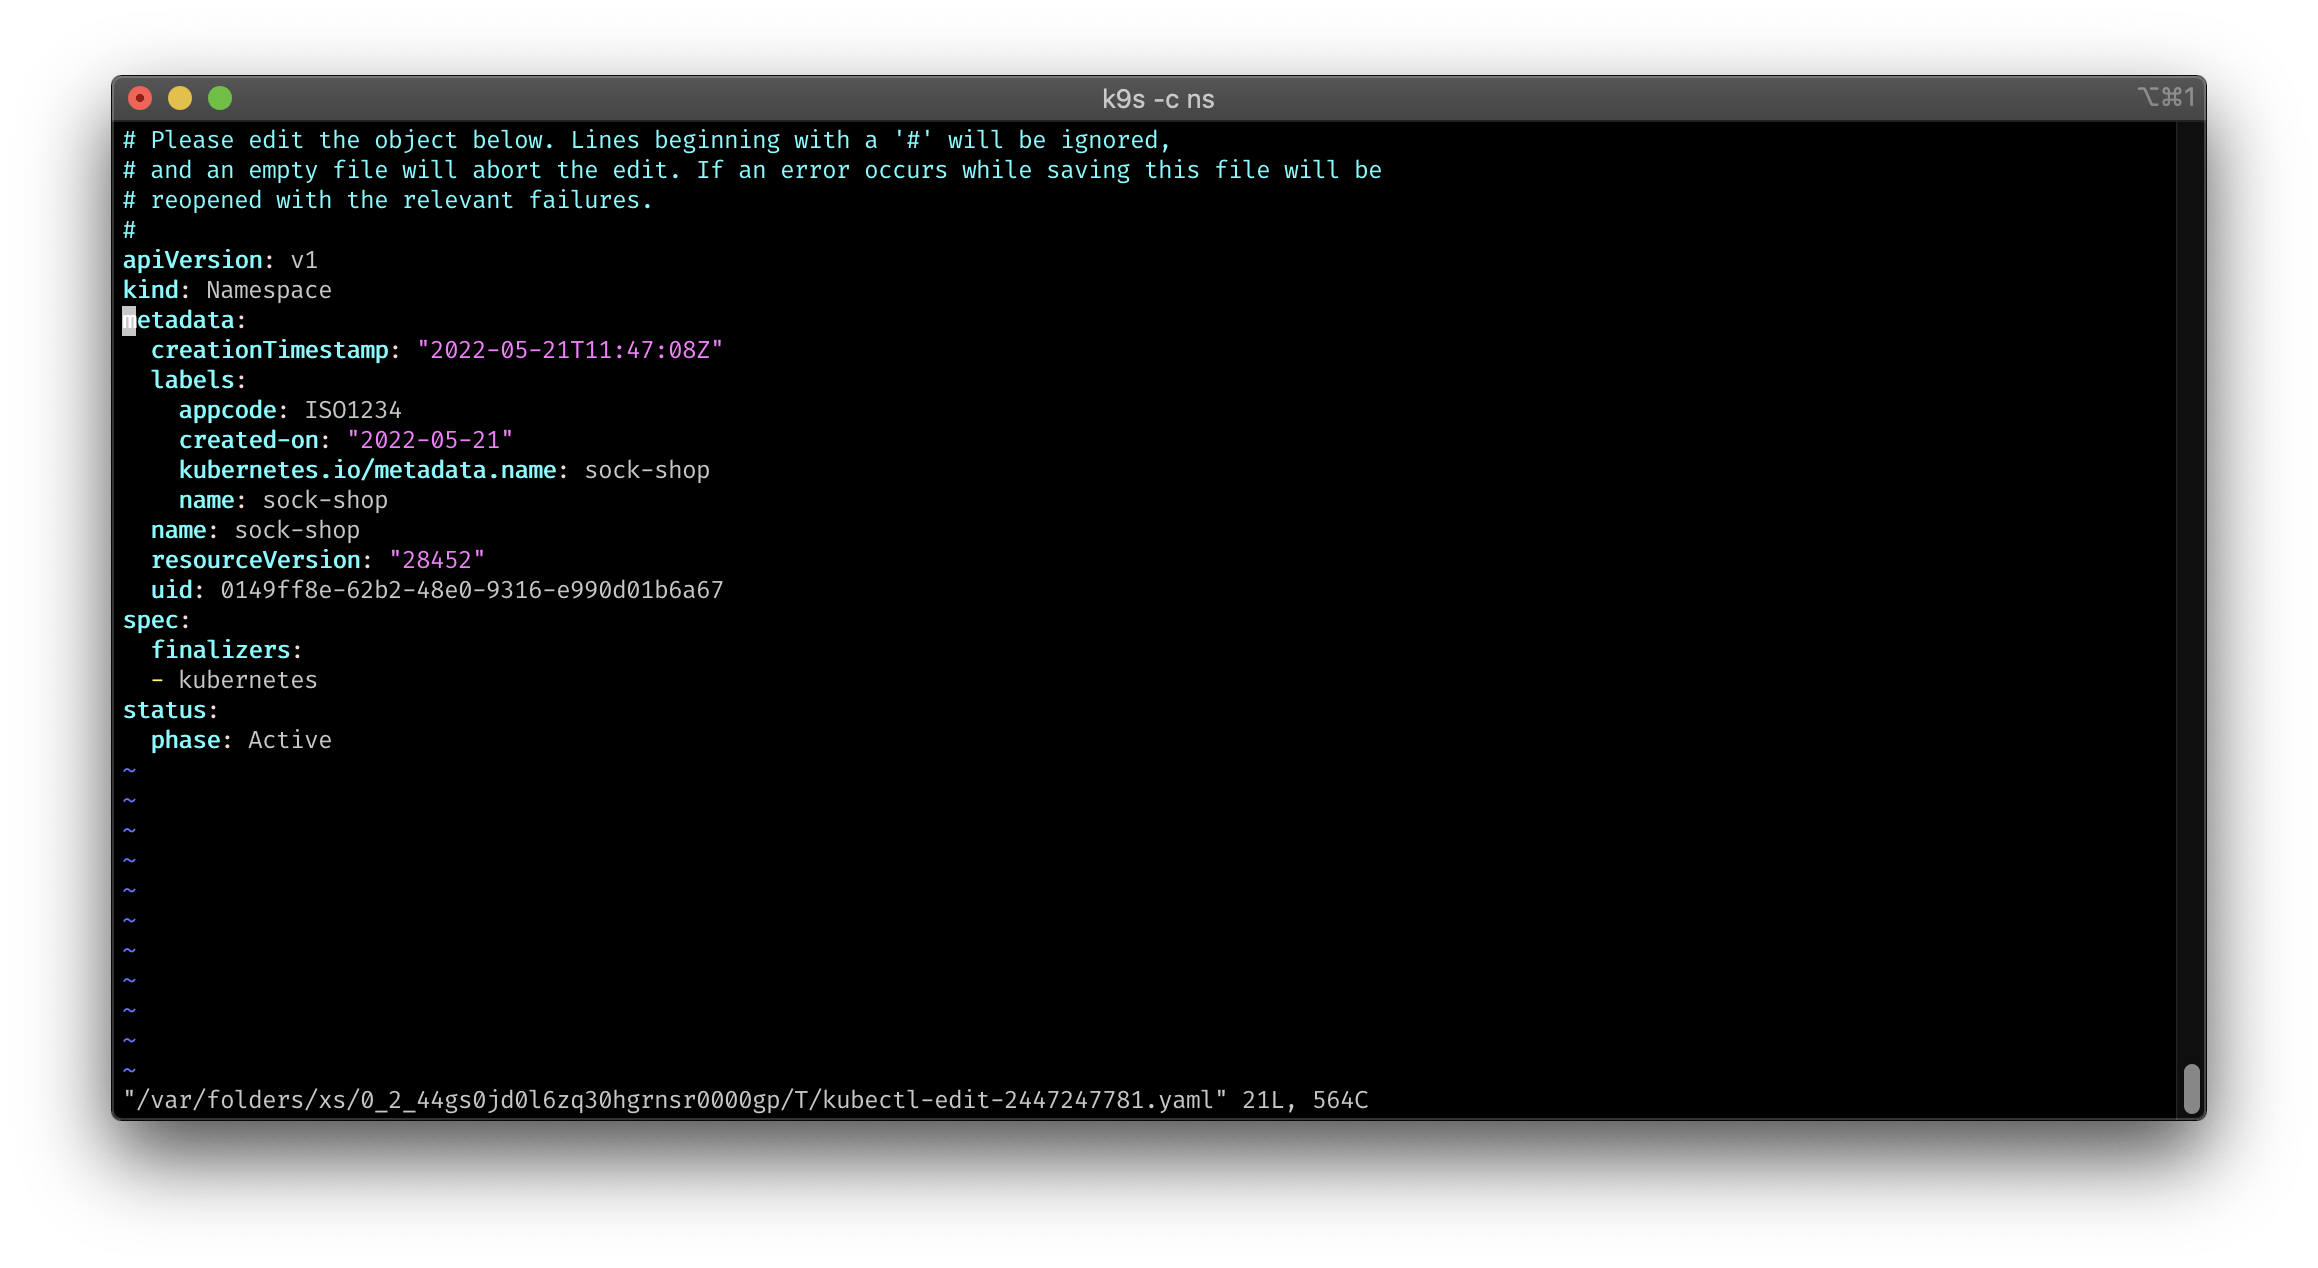
And we can see, that the labes appcode, name and created-on are set, as defined in our code.
Cleanup
Type make destroy to clean up all the cloud resources, you just created.
Always clean up your unused cloud resources: Avoid cloud waste and save money!
Wrap up
As we can see now in this little demo, how quick and easy it is to write policies in jsPolicy, and deploy them via GitOps using Flux.
Using a touring complete language, like TypeScript is also a plus: You can write and test them in the same way you write your application logic. Use the same toolchain and software development process to write policies is a plus point too for me. This gives you also access to the huge ecosystem of libraries from npmjs or from your private registry. Which means you can share entire policies or reusable functions via npmjs or via your private registry.
You can stack this, by using Pulumi and write your infrastructure definition in TypeScript too!