


Flux With Buckets: Is This Still GitOps?
How to use the Flux Bucket component with AWS S3 with Civo and Pulumi


Table of contents
TL;DR; Where Code?
As usual, you can jump straight into the code. Just by clicking on the link below:
What Is The Flux Bucket Component?
Thats what I try to answer with this article, and the motivation to do was my own tweet:
The Anatomy Of The Flux Toolkit
Flux is a GitOps backend for Kubernetes and follow the following four GitOps Principles:
Declarative: A system managed by GitOps must have its desired state expressed declaratively.
Versioned and Immutable: The desired state is stored in a way that enforces immutability, and versioning and retains a complete version history.
Pulled Automatically: Software agents automatically pull the desired state declarations from the source.
Continuously Reconciled: Software agents continuously observe the actual system state and attempt to apply the desired state.
See The OpenGitOps page for more details
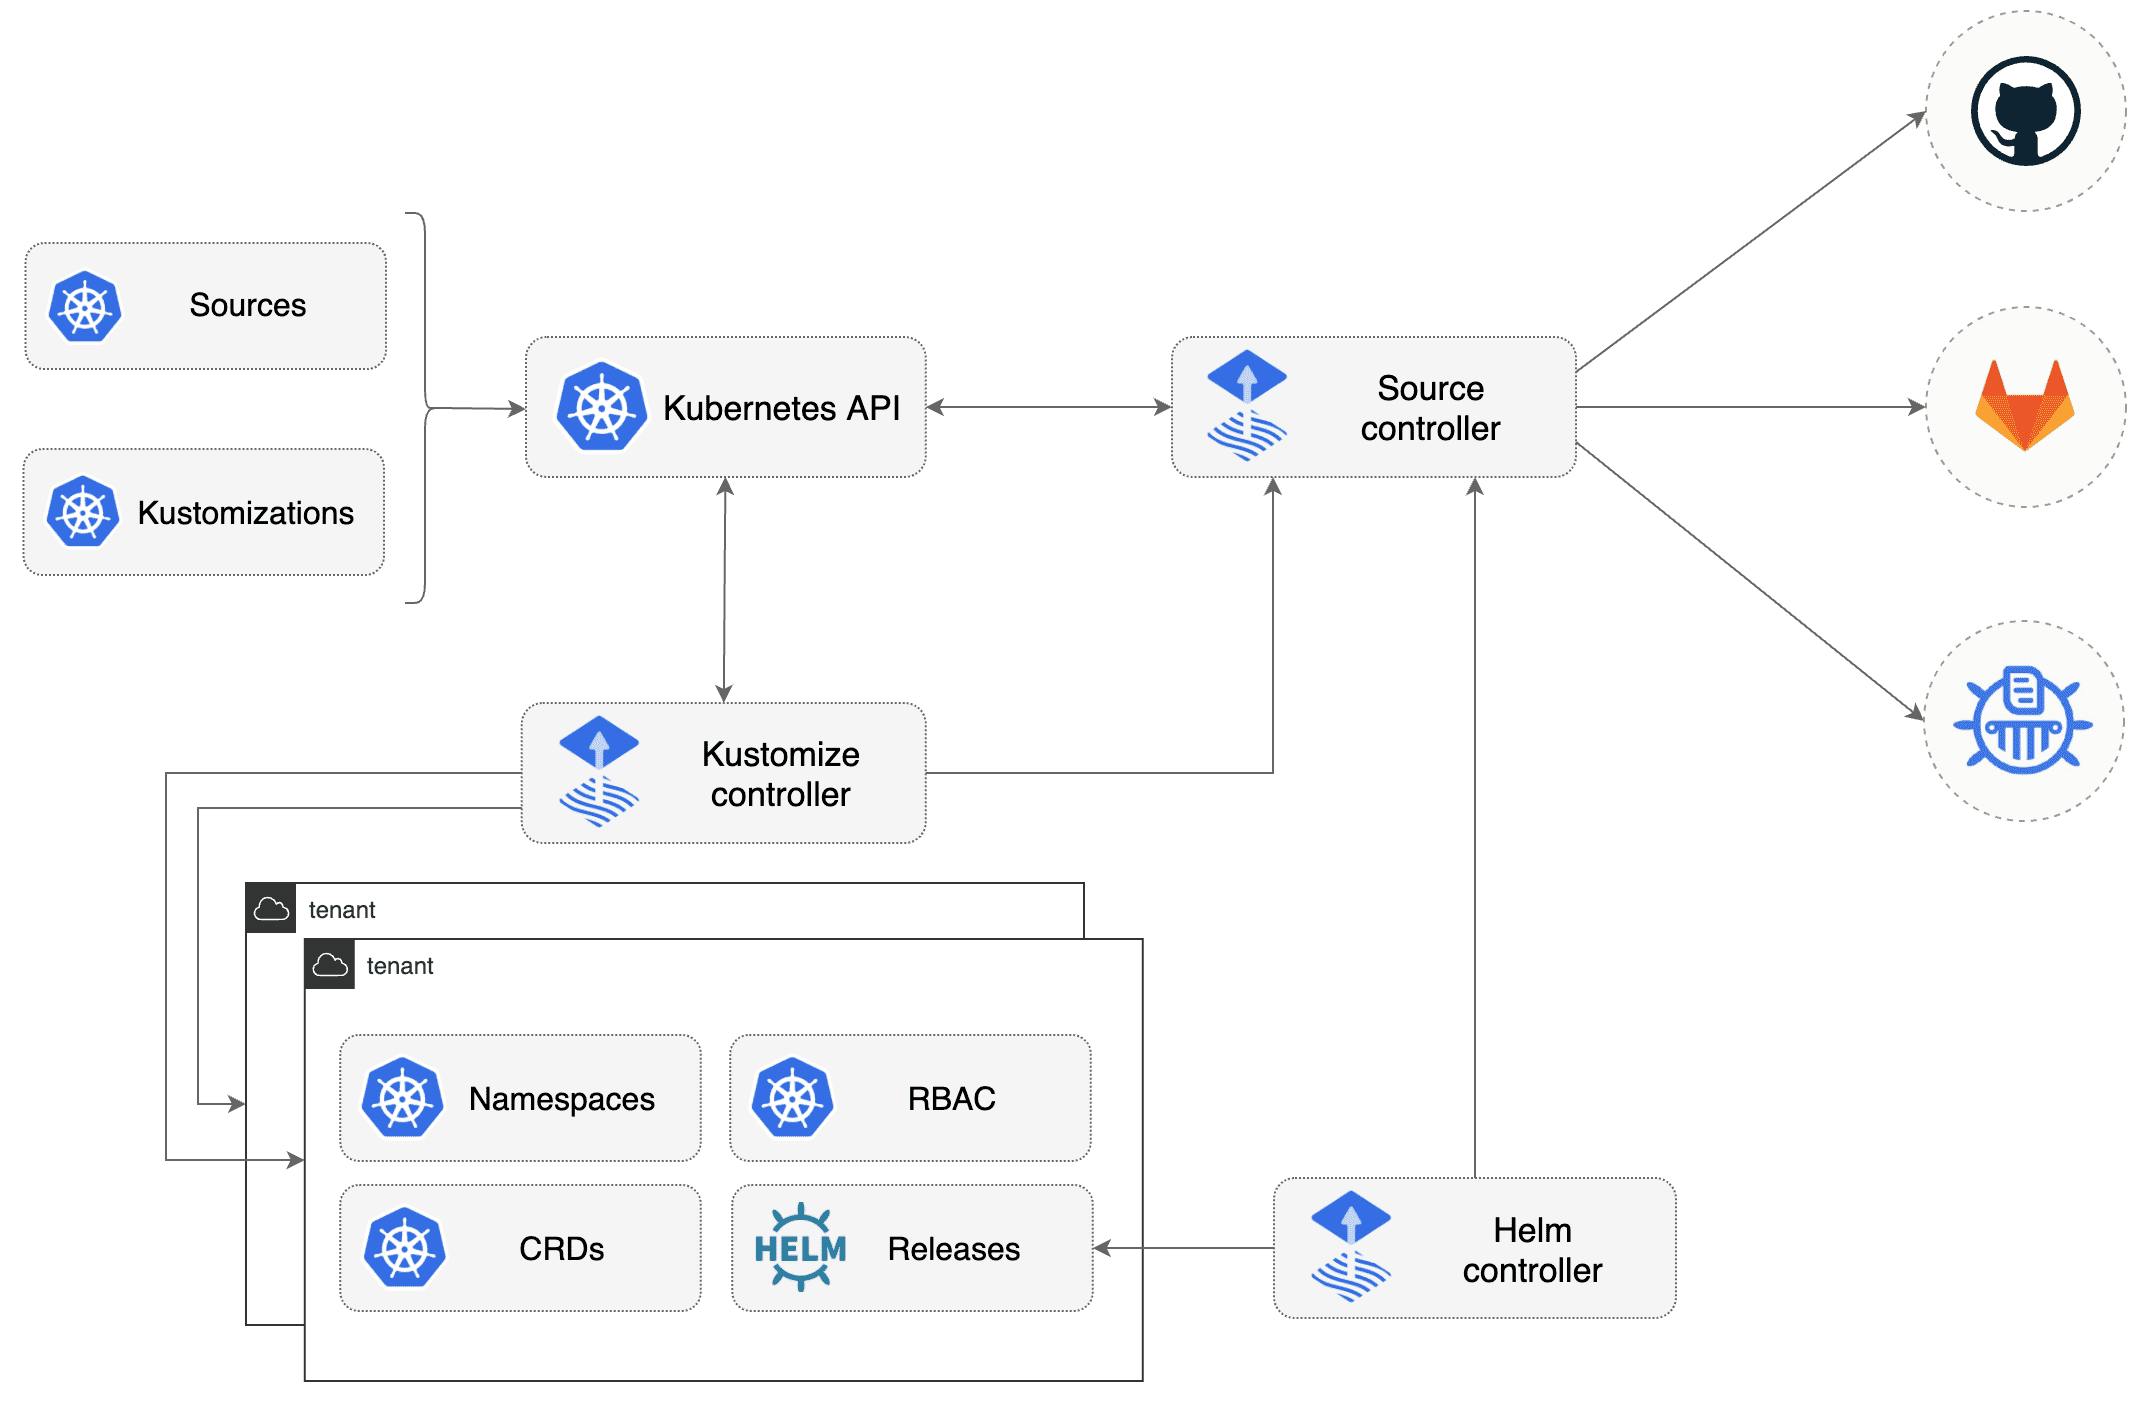
First, you have to understand that Flux is a toolbox of different components. Each of the components has a specific use case.
Flux itself consists of five categories of components and their corresponding Kubernetes controllers:
Source Controller
Kustomize Controller
Helm Controller
Notification Controller
Image Automation Controller
Source Controller
The task of the source components is to provide a common interface to access the specific artifact. Be it a helm chart or a kustomize directory.
The following resource types are available to choose from:
Bucket
GitRepository
HelmChart
HelmRepository
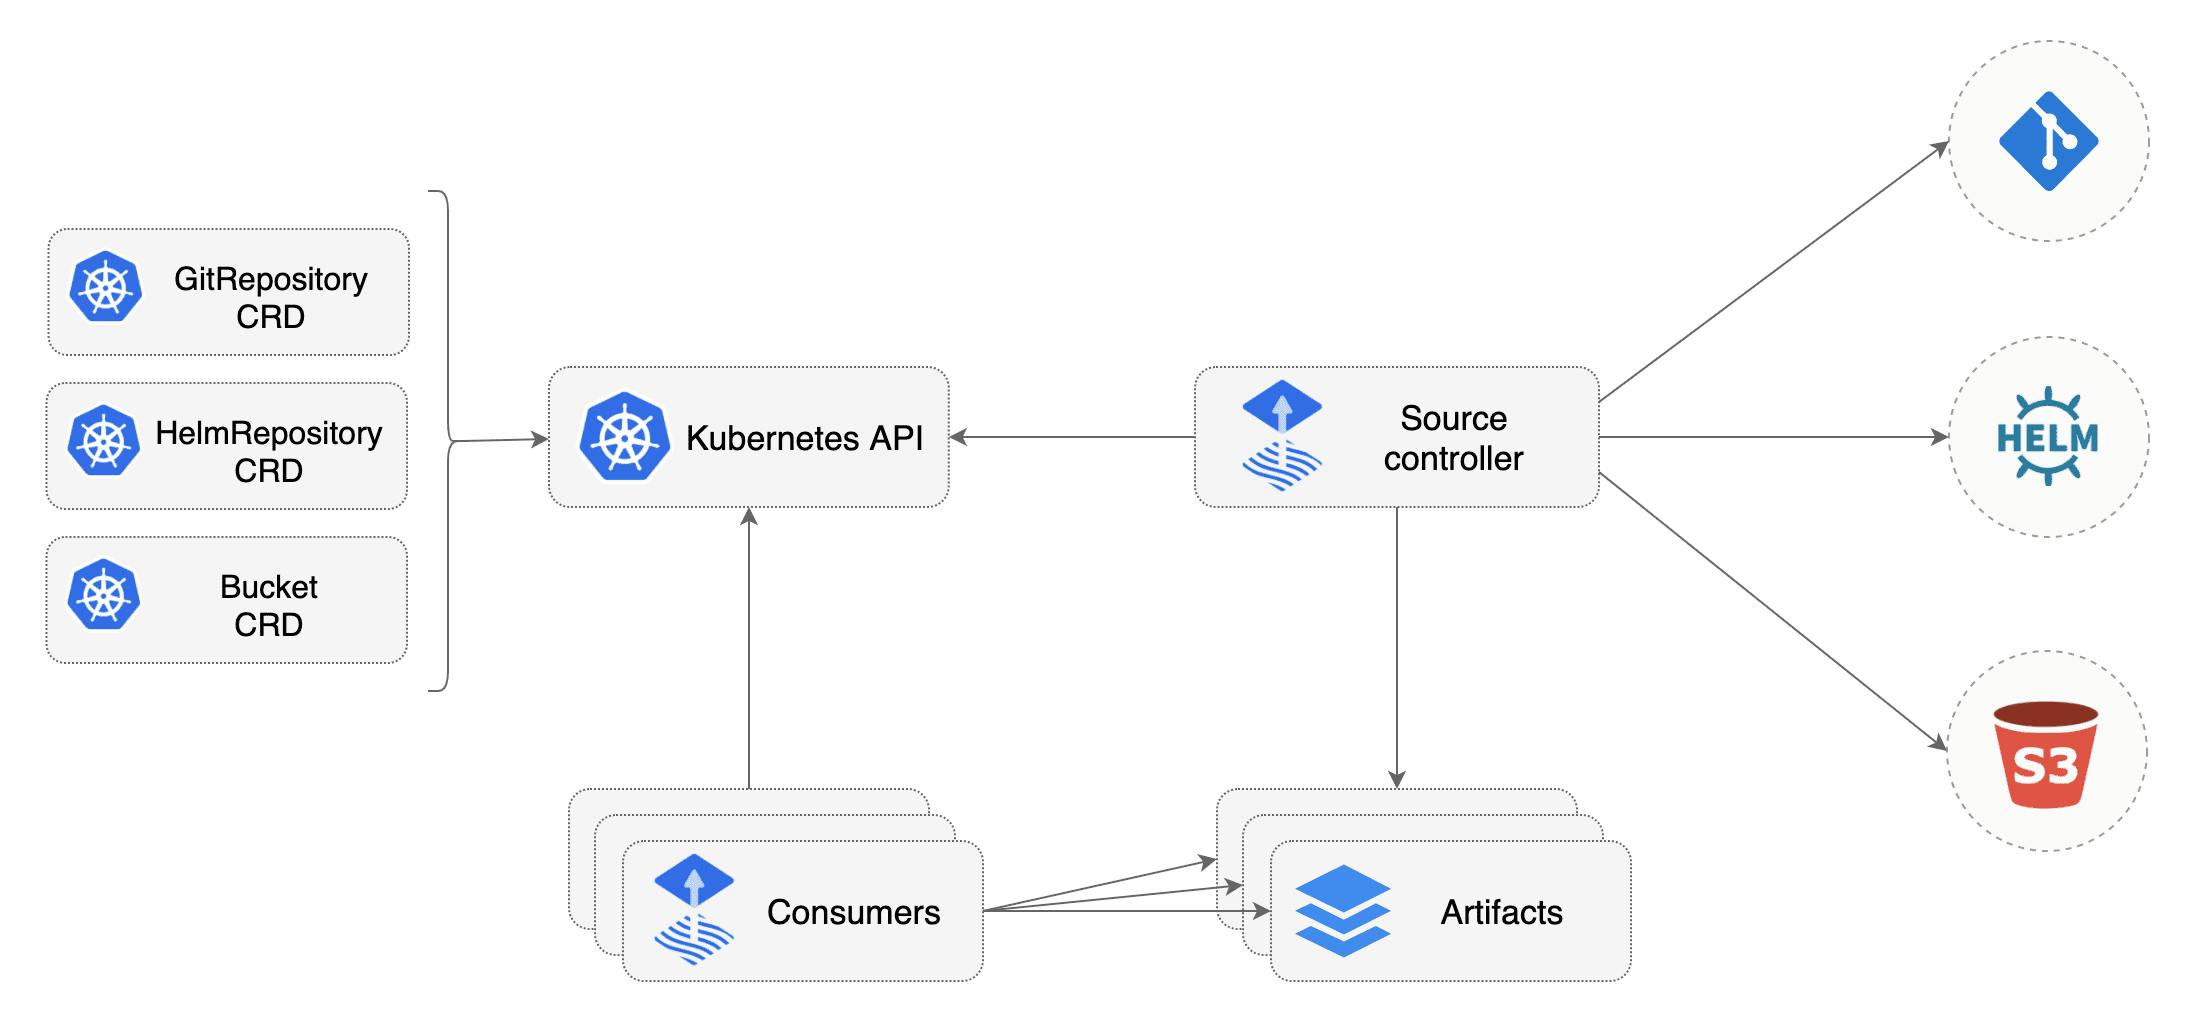
In this article, we will focus on the Bucket resource type.
Kustomize Controller
The Kustomize controller is to run your workload defined with Kubernetes manifests and organized with Kustomize. In my demo, we use this too, but I don't focus on it in this article.
Helm Controller
The Helm controller is taking to release your Helm charts. Very short description I know, but it does not more or less.
Notification Controller And Image Automation Controller
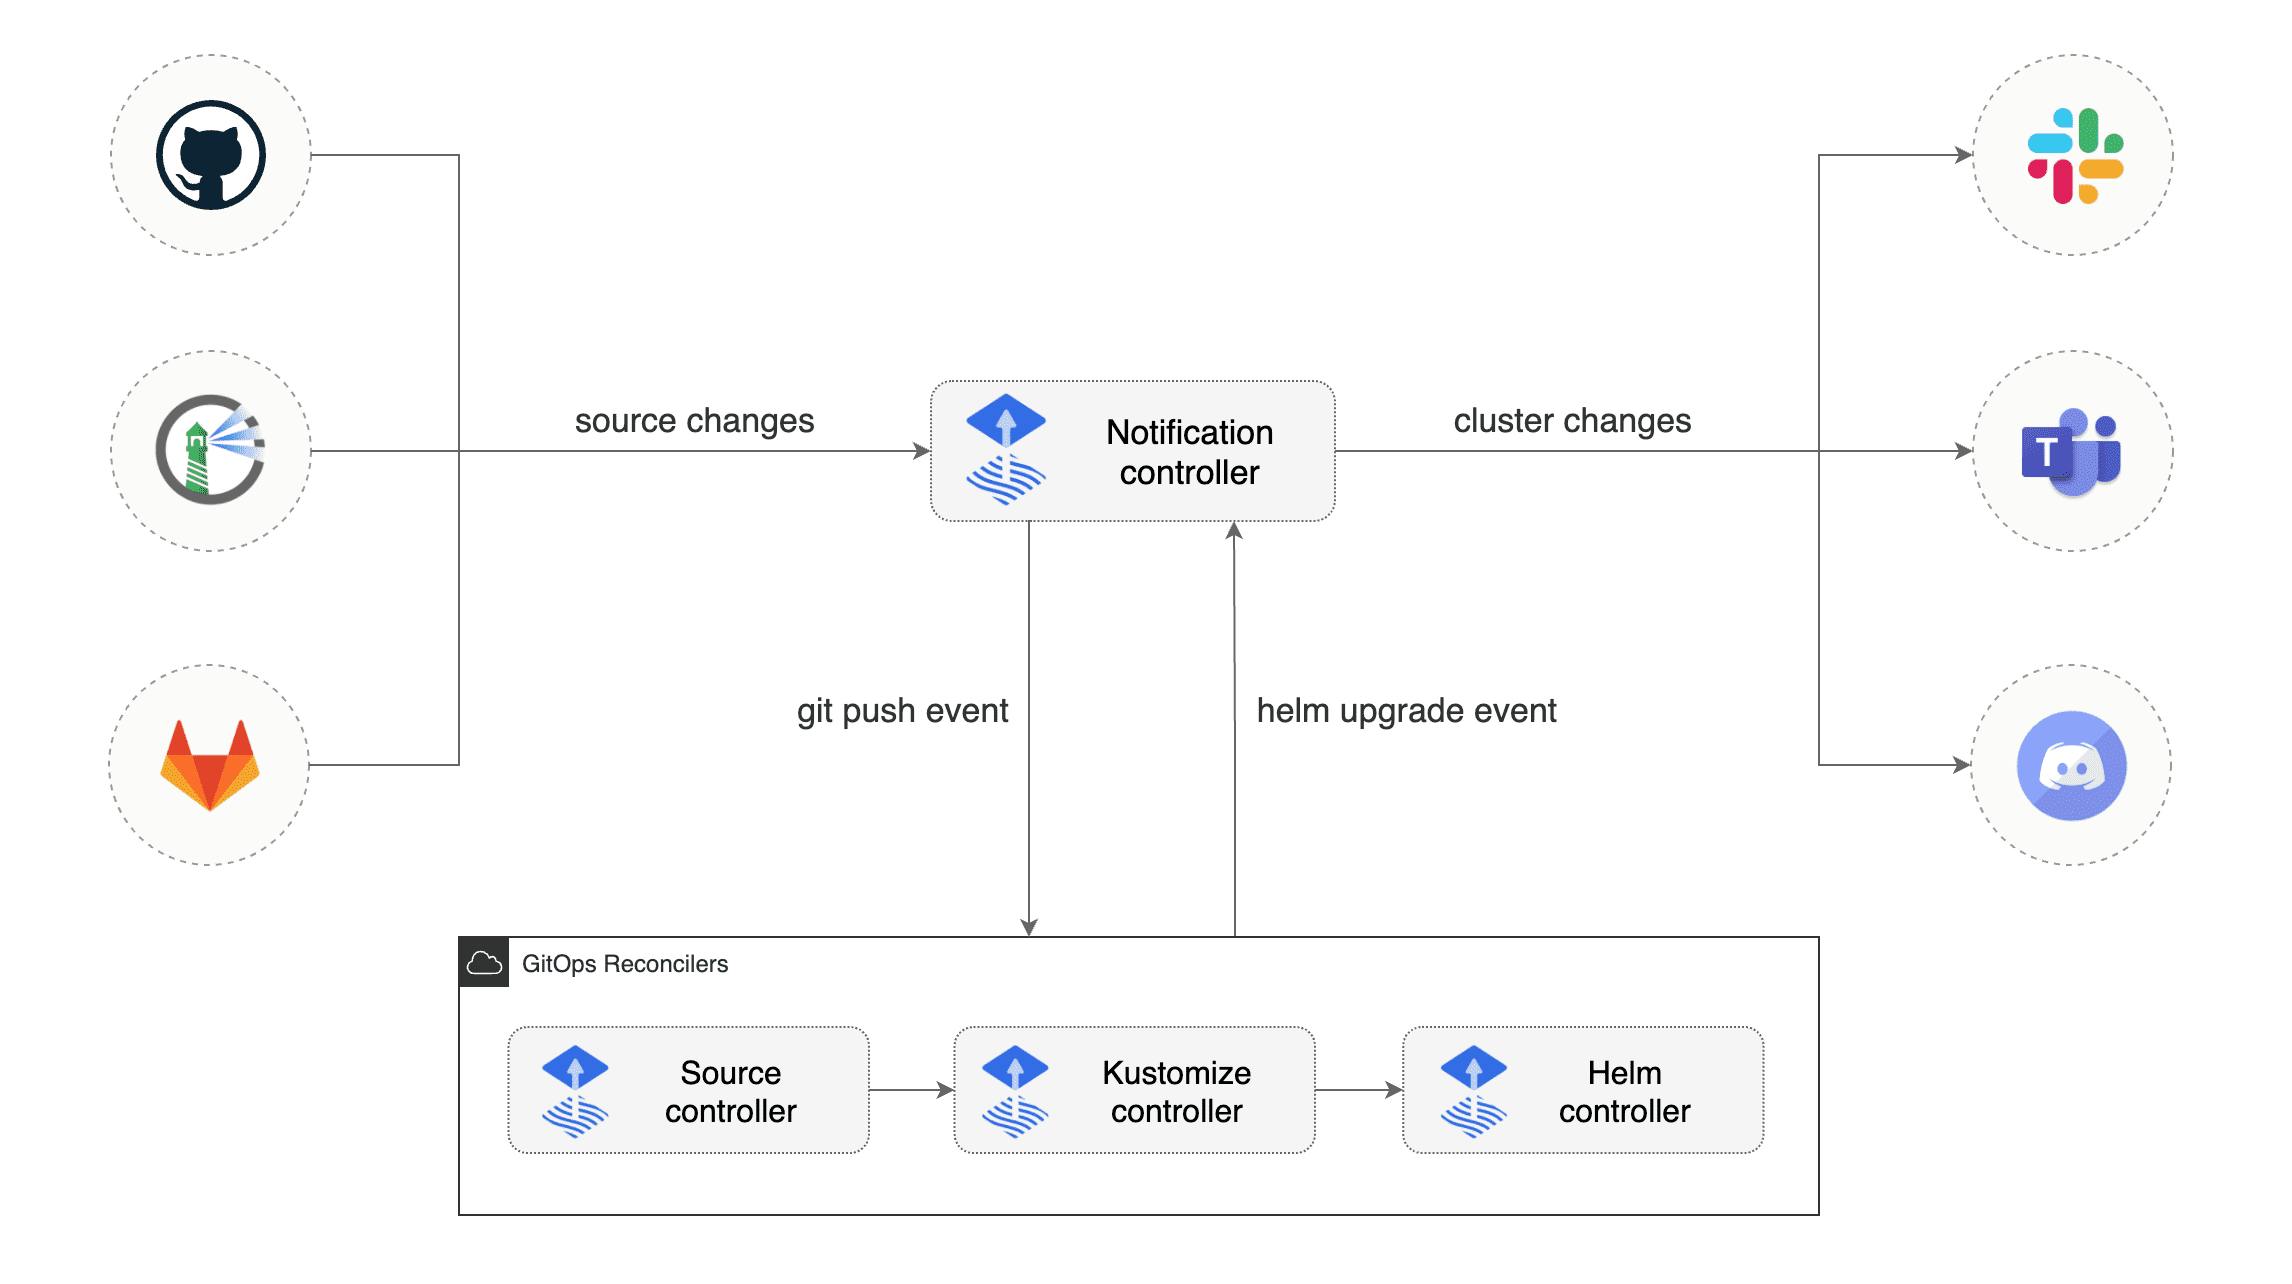
The notification controller handles all in- and outbound events. When there is an event from an external system (e.g. GitHub) it takes care to notify the toolkit controller about any changes.
The image automation controller can scan your container registry for new images and updates your yaml manifest and commits this changes to your git repository too. This works not for a helm source controller.
The Flux Bucket Component
The Bucket source component allows as to produce an artifact from an object storage solutions. There is already inbuilt support for AWS S3, Google Cloud Storage, Azure Blob Storage and a so-called Generic provider.
The Generic provider is for all other providers which can communicate with any AWS S3 compatible object storage. Possible examples are MinIO (self-hosted) or cloud provider like DigitalOcean with their object storage offering called Spaces.
All we need to do is to create a bucket resource and a kustomize resource to point to the bucket. In this example as metioned before, I use only Pulumi to create these resources for me. But you can create the manifest in yaml too, if you want to.
What is the advantage of using the Flux Bucket component?
One advantage of using the Bucket component is during the development of your manifests for your applications. To test them you just drop them into your bucket and you are done, Flux will pick them up from there. There is no need to go through the whole git flow (commit, push, pull, merge, rebase, etc.) during the development process.
It is also a very quick and easy way to provide your artifacts, as maybe not everyone is familiar with git or has access to it. Plus nothing is more annoying than having to deal with merge conflicts, when you are not 100% safe with the usage of git.
So what are the possible disadvantages? One that comes into my mind is that you lose the history of your changes. There is no way to rollback your changes in case of a failure. Apart from this, I don't see any serious disadvantages. If you have any, feel free to share them in the comments of this article! Feedback is always appreciated!
But overall, I start to like the Bucket component. I see some benefits from using it, when I look to some projects I work on.
And yes, you I need to call it from now on BucketOps.
The Demo
In this demo, I am going to deploy the Weaveworks Sock Shop application via the Flux Bucket component.
I choose the Sock Shop as a demo application, because it has a very good microservice architecture:
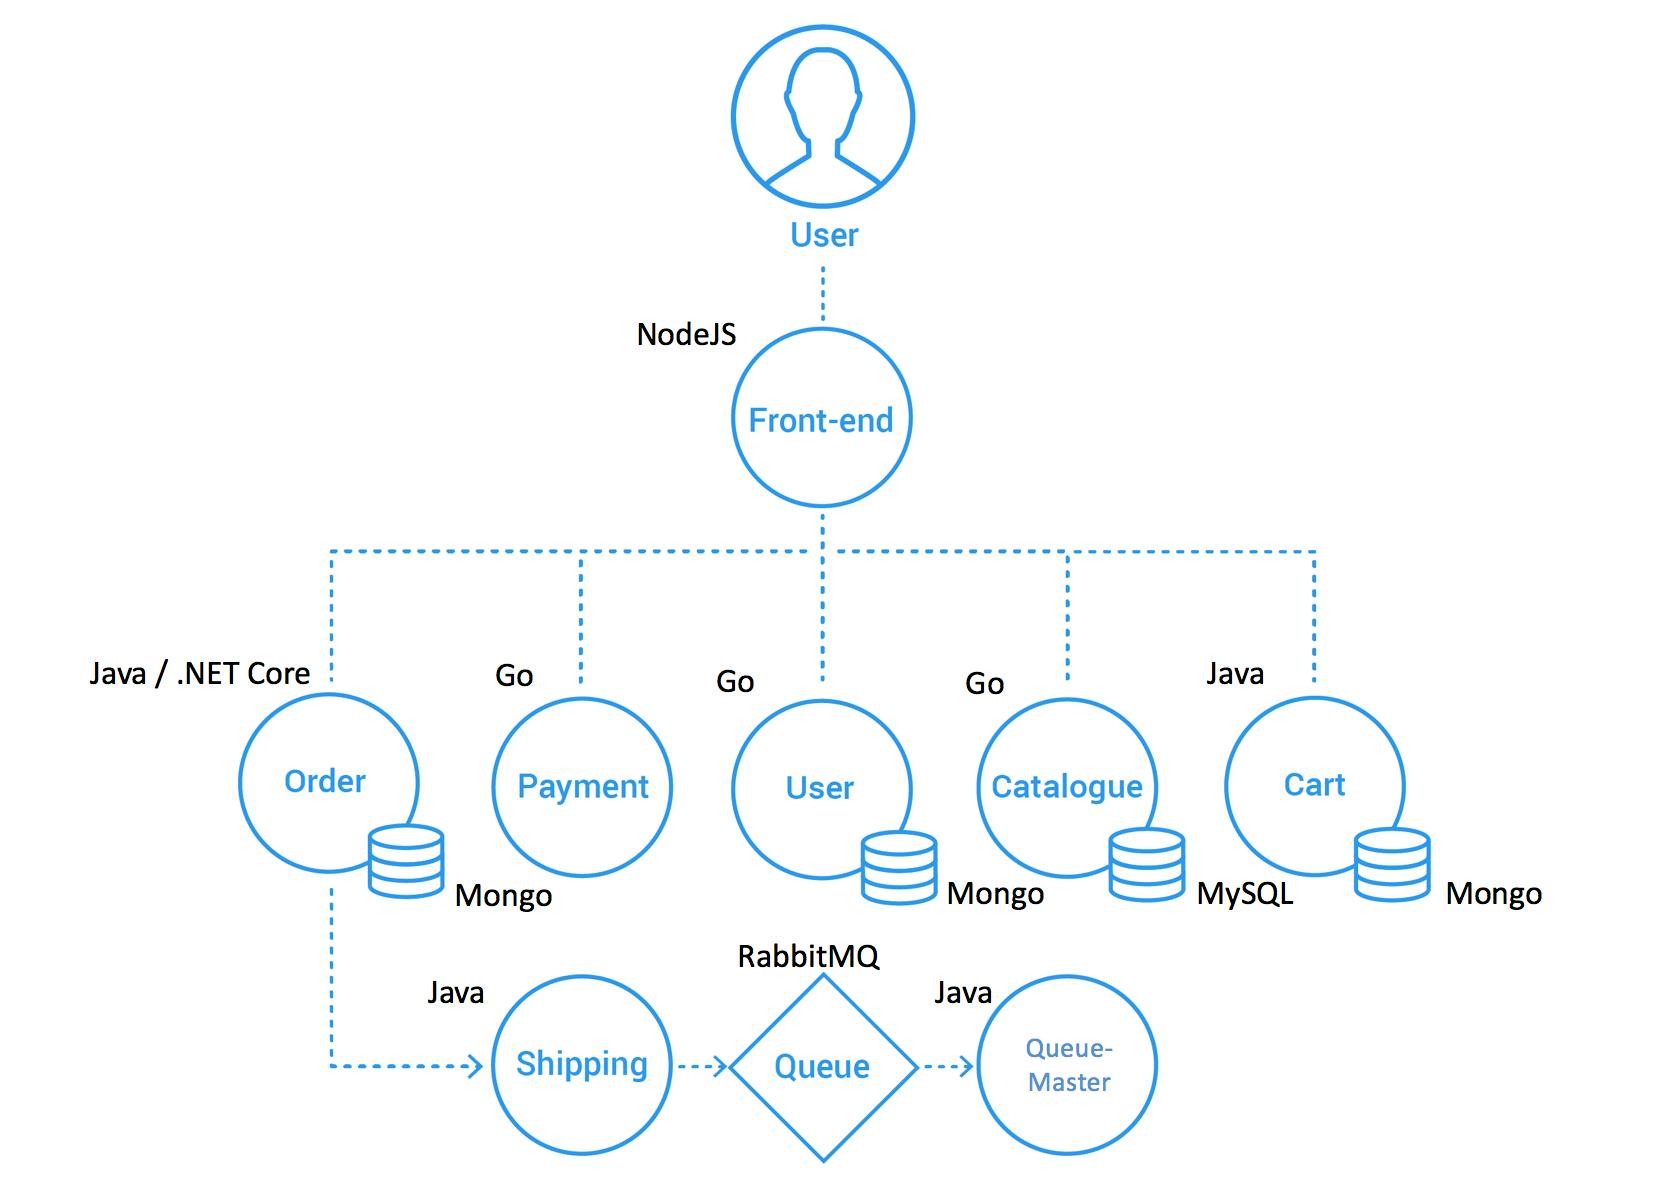
I am going to use Civo as my cloud provider and AWS S3 as my object storage provider. Both providers will be provisioned with the help of Pulumi.
Prerequisites
The
FluxCLI should be installed on your machine. See the Flux CLI installationYou need to have an account at Civo and have a Civo API token ready. Head over to Civo and create a new account.
The
PulumiCLI should be present on your machine. InstallingPulumiis easy, just head over to the get-stated website and chose the appropriate version and way to download the cli. To store your state files, you can use their free SaaS offering
Infrastructure Deployment
In the folder infrastructure, I created two different Pulumi stacks. One for the cloud provider and one for deploying the Flux components, including the Bucket component.
I use the civo-go template, when I created the Pulumi stack:
pulumi new civo-go
As I am going to create a AWS S3 bucket too via Pulumi, we need to add the aws-classic provider to our stack.
go get github.com/pulumi/pulumi-aws/sdk/v5
Now just add the AWS credentials to the stack, and we are good to go to deploy the Pulumi stack.
pulumi config set aws:accessKey xxx -secret
pulumi config set aws:secretKey yyy --secret
pulumi config set aws:region eu-central-1
As I split the deployment in two different stacks, I just neet to take care to export the important information. This way I can reference them with the help of the StackReference method.
...
ctx.Export("kubeconfig", pulumi.ToSecret(cluster.Kubeconfig))
ctx.Export("accessKey", awsConfig.GetSecret("accessKey"))
ctx.Export("secretKey", awsConfig.GetSecret("secretKey"))
ctx.Export("bucket", bucket.Bucket)
ctx.Export("bucket-region", bucket.Region)
...
I need the kubeconfig, the aws credentials and the bucket name and region in my flux deployment.
The Flux stack is taking care tof deploying the Helm chart of Flux and after this, the Bucket and Kustomize component.
...
flux, err := helm.NewRelease(ctx, "flux2", &helm.ReleaseArgs{
            Name:            pulumi.String("flux2"),
            Chart:           pulumi.String("flux2"),
            Version:         pulumi.String("0.16.0"),
            Namespace:       fluxNS.Metadata.Name(),
            CreateNamespace: pulumi.Bool(true),
            RepositoryOpts: helm.RepositoryOptsArgs{
                Repo: pulumi.String("https://fluxcd-community.github.io/helm-charts"),
            },
            ValueYamlFiles: pulumi.AssetOrArchiveArray{
                pulumi.NewFileAsset("values/flux2.yaml"),
            },
        }, pulumi.Provider(provider), pulumi.Parent(fluxNS))
        if err != nil {
            return err
        }

        secret, err := v1.NewSecret(ctx, "flux-bucket-secret", &v1.SecretArgs{
            Metadata: metav1.ObjectMetaArgs{
                Name:      pulumi.StringPtr("flux-bucket-secret"),
                Namespace: fluxNS.Metadata.Name(),
            },
            StringData: pulumi.StringMap{
                "accesskey": cloud.GetStringOutput(pulumi.String("accessKey")),
                "secretkey": cloud.GetStringOutput(pulumi.String("secretKey")),
            },
            Type: pulumi.String("Opaque"),
        }, pulumi.Provider(provider), pulumi.Parent(flux))
        if err != nil {
            return err
        }
        bucketCR, err := apiextensions.NewCustomResource(ctx, "aws-bucket", &apiextensions.CustomResourceArgs{
            Metadata: &metav1.ObjectMetaArgs{
                Name:      pulumi.String("aws-bucket"),
                Namespace: fluxNS.Metadata.Name(),
            },
            ApiVersion: pulumi.String("source.toolkit.fluxcd.io/v1beta2"),
            Kind:       pulumi.String("Bucket"),
            OtherFields: kubernetes.UntypedArgs{
                "spec": &pulumi.Map{
                    "interval":   pulumi.String("1m0s"),
                    "provider":   pulumi.String("aws"),
                    "bucketName": cloud.GetStringOutput(pulumi.String("bucket")),
                    "endpoint":   pulumi.String("s3.amazonaws.com"),
                    "region":     cloud.GetStringOutput(pulumi.String("bucket-region")),
                    "secretRef": &pulumi.Map{
                        "name": secret.Metadata.Name(),
                    },
                },
            },
        }, pulumi.Provider(provider), pulumi.Parent(flux))
        if err != nil {
            return err
        }
        _, err = apiextensions.NewCustomResource(ctx, "demo-kustomization", &apiextensions.CustomResourceArgs{
            Metadata: &metav1.ObjectMetaArgs{
                Name:      pulumi.String("demo-kustomization"),
                Namespace: fluxNS.Metadata.Name(),
            },
            ApiVersion: pulumi.String("kustomize.toolkit.fluxcd.io/v1beta2"),
            Kind:       pulumi.String("Kustomization"),
            OtherFields: kubernetes.UntypedArgs{
                "spec": &pulumi.Map{
                    "interval": pulumi.String("1m0s"),
                    "path":     pulumi.String("./"),
                    "prune":    pulumi.Bool(true),
                    "sourceRef": &pulumi.Map{
                        "kind":      bucketCR.Kind.ToStringOutput(),
                        "name":      bucketCR.Metadata.Name(),
                        "namespace": fluxNS.Metadata.Name(),
                    },
                },
            },
        }, pulumi.Provider(provider), pulumi.Parent(bucketCR))
As you can see, I created a Kubernetes secret which contains the AWS credentials. All done in with the secret management of Pulumi. At least for the deployment of the infrastructure, I don't need an external secret manager.
To ease the deployment, I use a Makefile to deploy both stack. I am not that good in writing Makefiles, so don't be to hard on me!
With the following command, and a couple of minutes of wait time to provision the resources you should be finished with the first part of the demo.
make bootstrap
If you run the demo code, you will be prompted to enter some details, like Civo Token, AWS credentials, etc.
After the deployment is successful, you can check with the following command the state of the flux bucket. The target in the Makefile is calling the flux cli for us:
make check-bucket

NAME            REVISION                                                                SUSPENDED       READY   MESSAGE
aws-bucket      e3b0c44298fc1c149afbf4c8996fb92427ae41e4649b934ca495991b7852b855        False           True    stored artifact for revision 'e3b0c44298fc1c149afbf4c8996fb92427ae41e4649b934ca495991b7852b855'
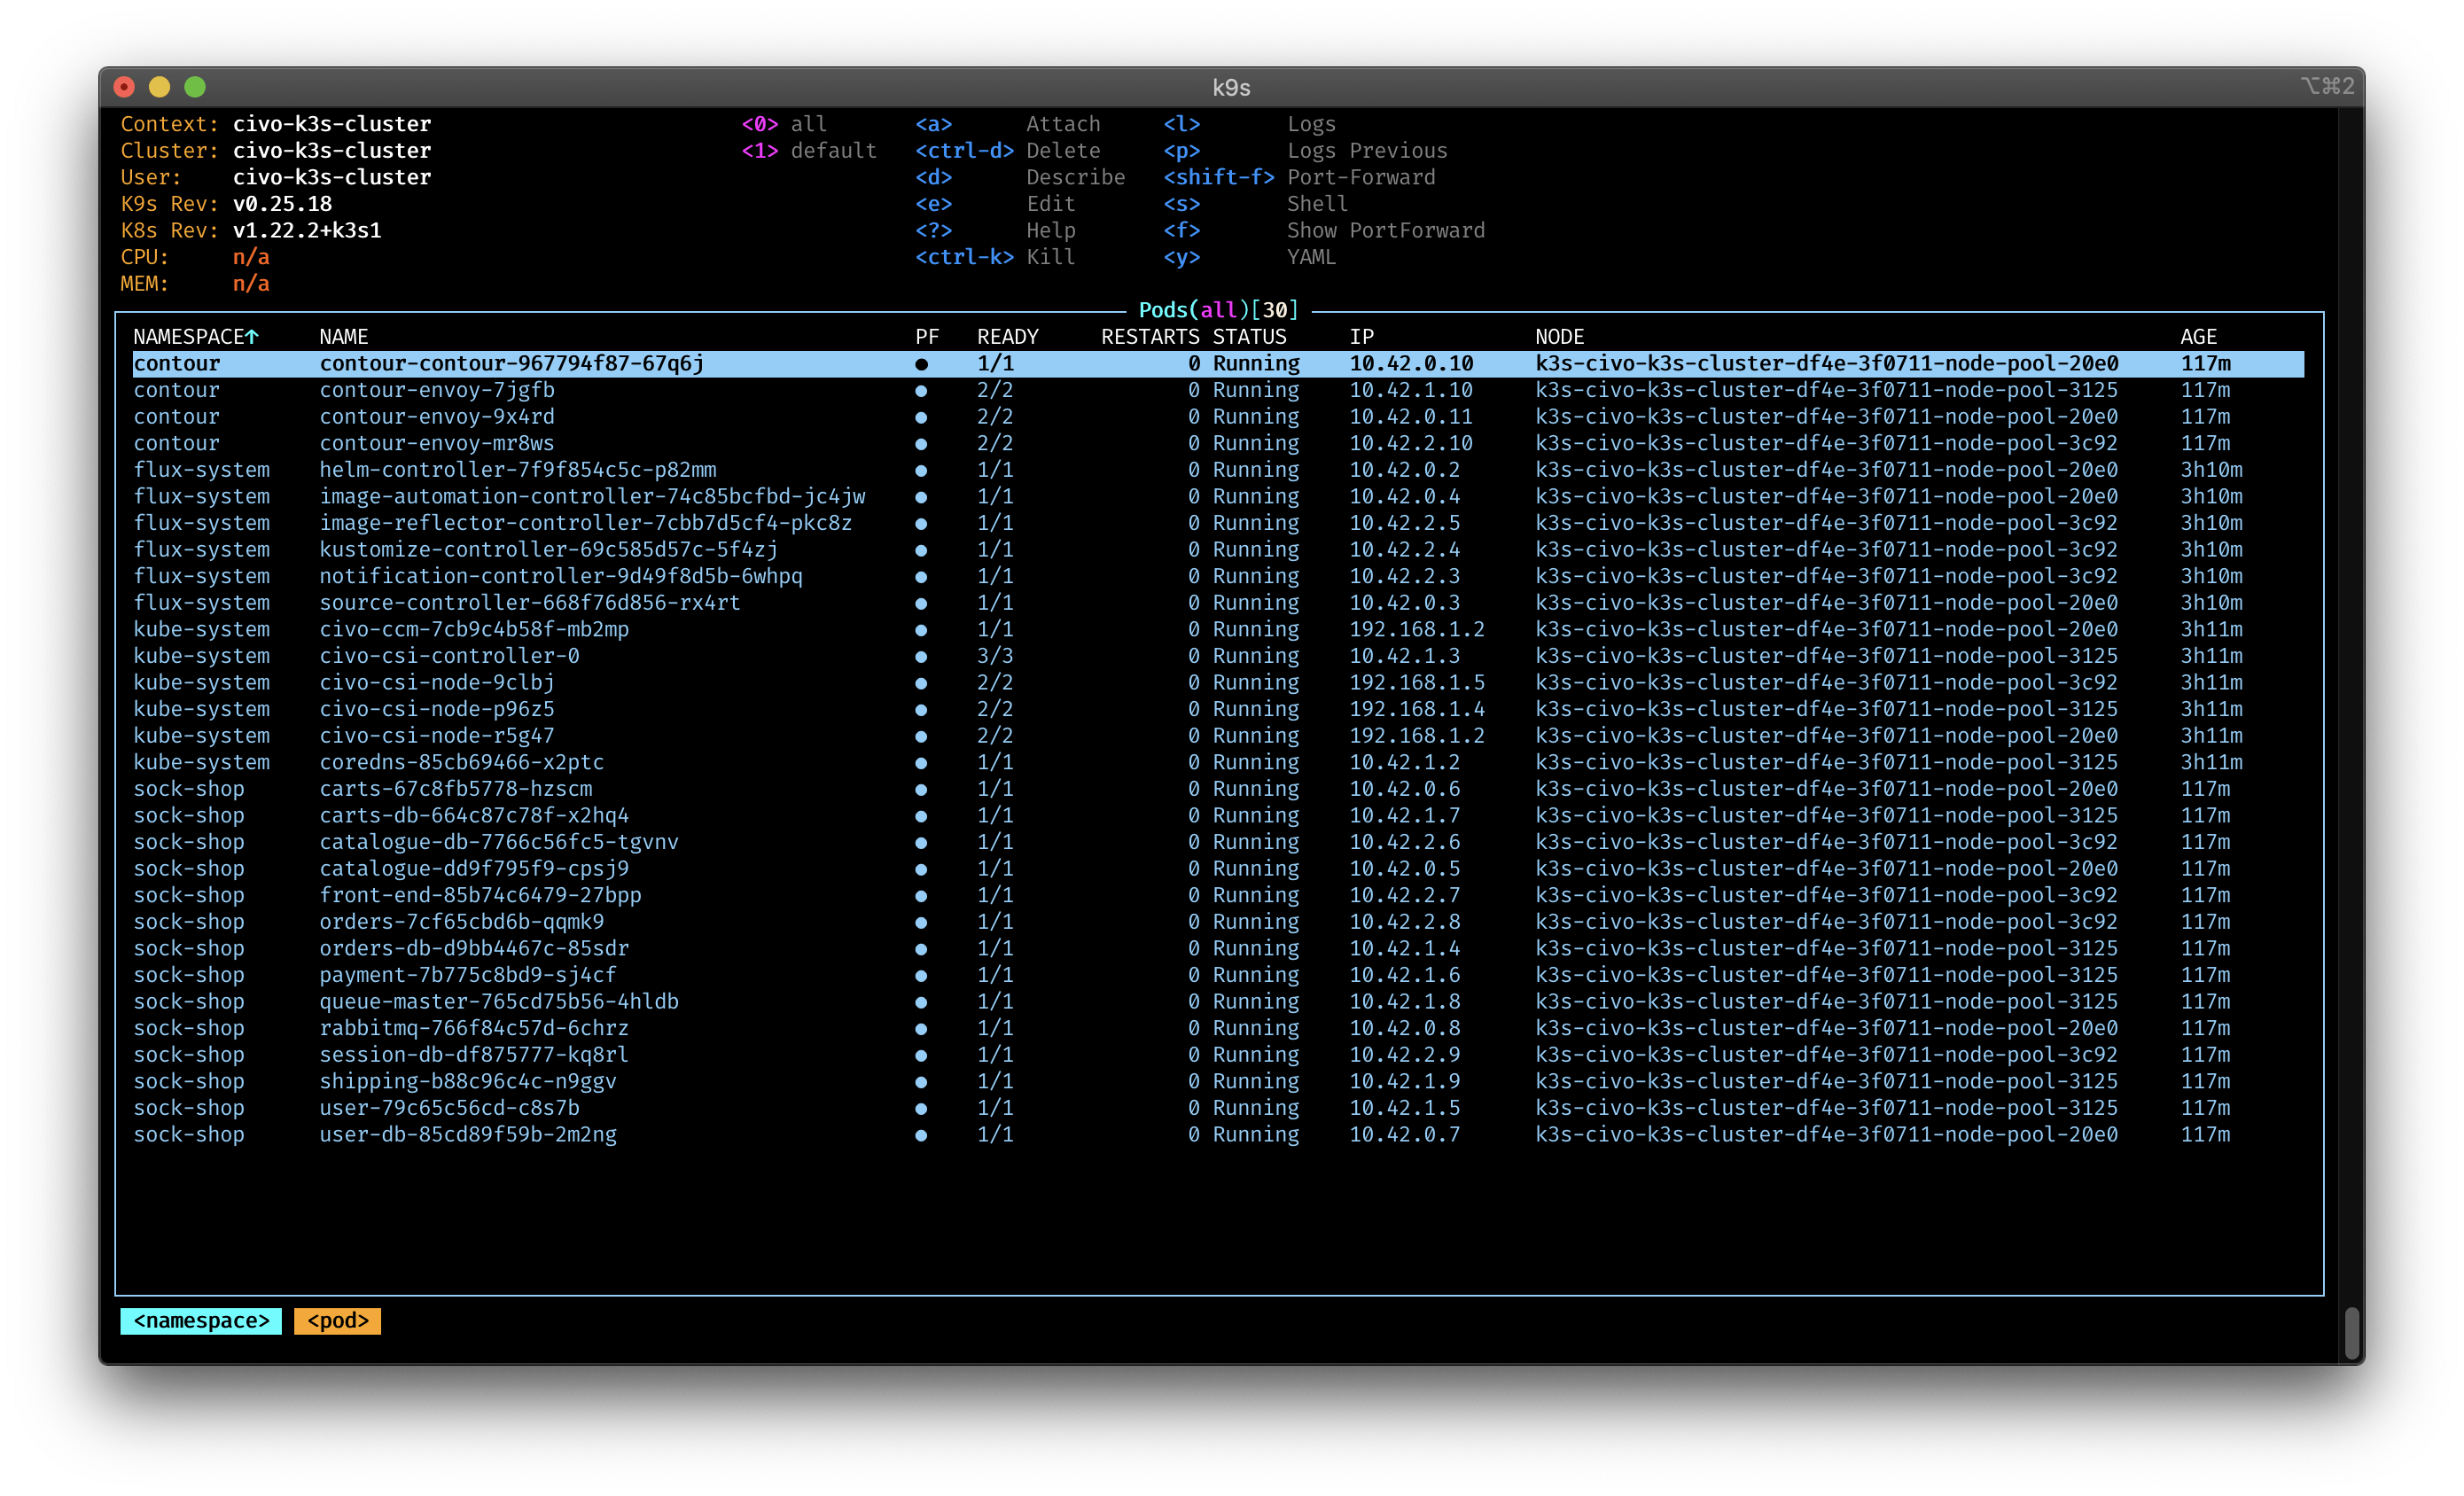
Or use K9s

Application deployment
Now we can finally deploy the Weavewroks Sock Shop application, through the Bucket component. For this I created the deploy folder with a simple kustomize structure.
In this folder I created the services and applications folder. I like to sepperate the different parts of the deployment in folders. This would help to define, in a cross-functional team, the responsibilities: Wo is in charge of what.
In the services, I describe all the services I want to deploy that are needed for the application and opertion. Here for example, I added flux and contour for the ingress via envoy.
Side note: I like to put Flux in the
servicesfolder, so I can use Flux to manage Flux.
In the applications folder, I describe the sock-shop application deployment. Added the GitRepository and HelmRelease manifest so flux is able to deploy the app.
To deploy the manifests folder to the bucket we just created, I use again the Makefile with following command:
make upload-aws
This will print the instructions I need to run.
If everything went according to the plan, you should see the following output:
aws s3 sync ./deploy/ s3://flux-source-bucket/
upload: deploy/applications/kustomization.yaml to s3://flux-source-bucket/applications/kustomization.yaml
upload: deploy/services/flux2/kustomization.yaml to s3://flux-source-bucket/services/flux2/kustomization.yaml
upload: deploy/services/contour/contour.yaml to s3://flux-source-bucket/services/contour/contour.yaml
upload: deploy/applications/sock-shop/sock-shop-repo.yaml to s3://flux-source-bucket/applications/sock-shop/sock-shop-repo.yaml
upload: deploy/applications/sock-shop/sock-shop.yaml to s3://flux-source-bucket/applications/sock-shop/sock-shop.yaml
upload: deploy/applications/sock-shop/kustomization.yaml to s3://flux-source-bucket/applications/sock-shop/kustomization.yaml
upload: deploy/services/flux2/flux-helm-repo.yaml to s3://flux-source-bucket/services/flux2/flux-helm-repo.yaml
upload: deploy/services/contour/kustomization.yaml to s3://flux-source-bucket/services/contour/kustomization.yaml
upload: deploy/services/contour/contour-helm-repo.yaml to s3://flux-source-bucket/services/contour/contour-helm-repo.yaml
upload: deploy/services/flux2/flux.yaml to s3://flux-source-bucket/services/flux2/flux.yaml
upload: deploy/kustomization.yaml to s3://flux-source-bucket/kustomization.yaml
upload: deploy/services/kustomization.yaml to s3://flux-source-bucket/services/kustomization.yaml
And all the resource should be applied to your cluster via `flux``
The Sock Shop is quite big and takes some time to be fully deployed and ready.
Side note: I created an DNS alias pointing the external IP of the loadbalancer. It's not automated, but you could use a project like
external-dnsto do it.
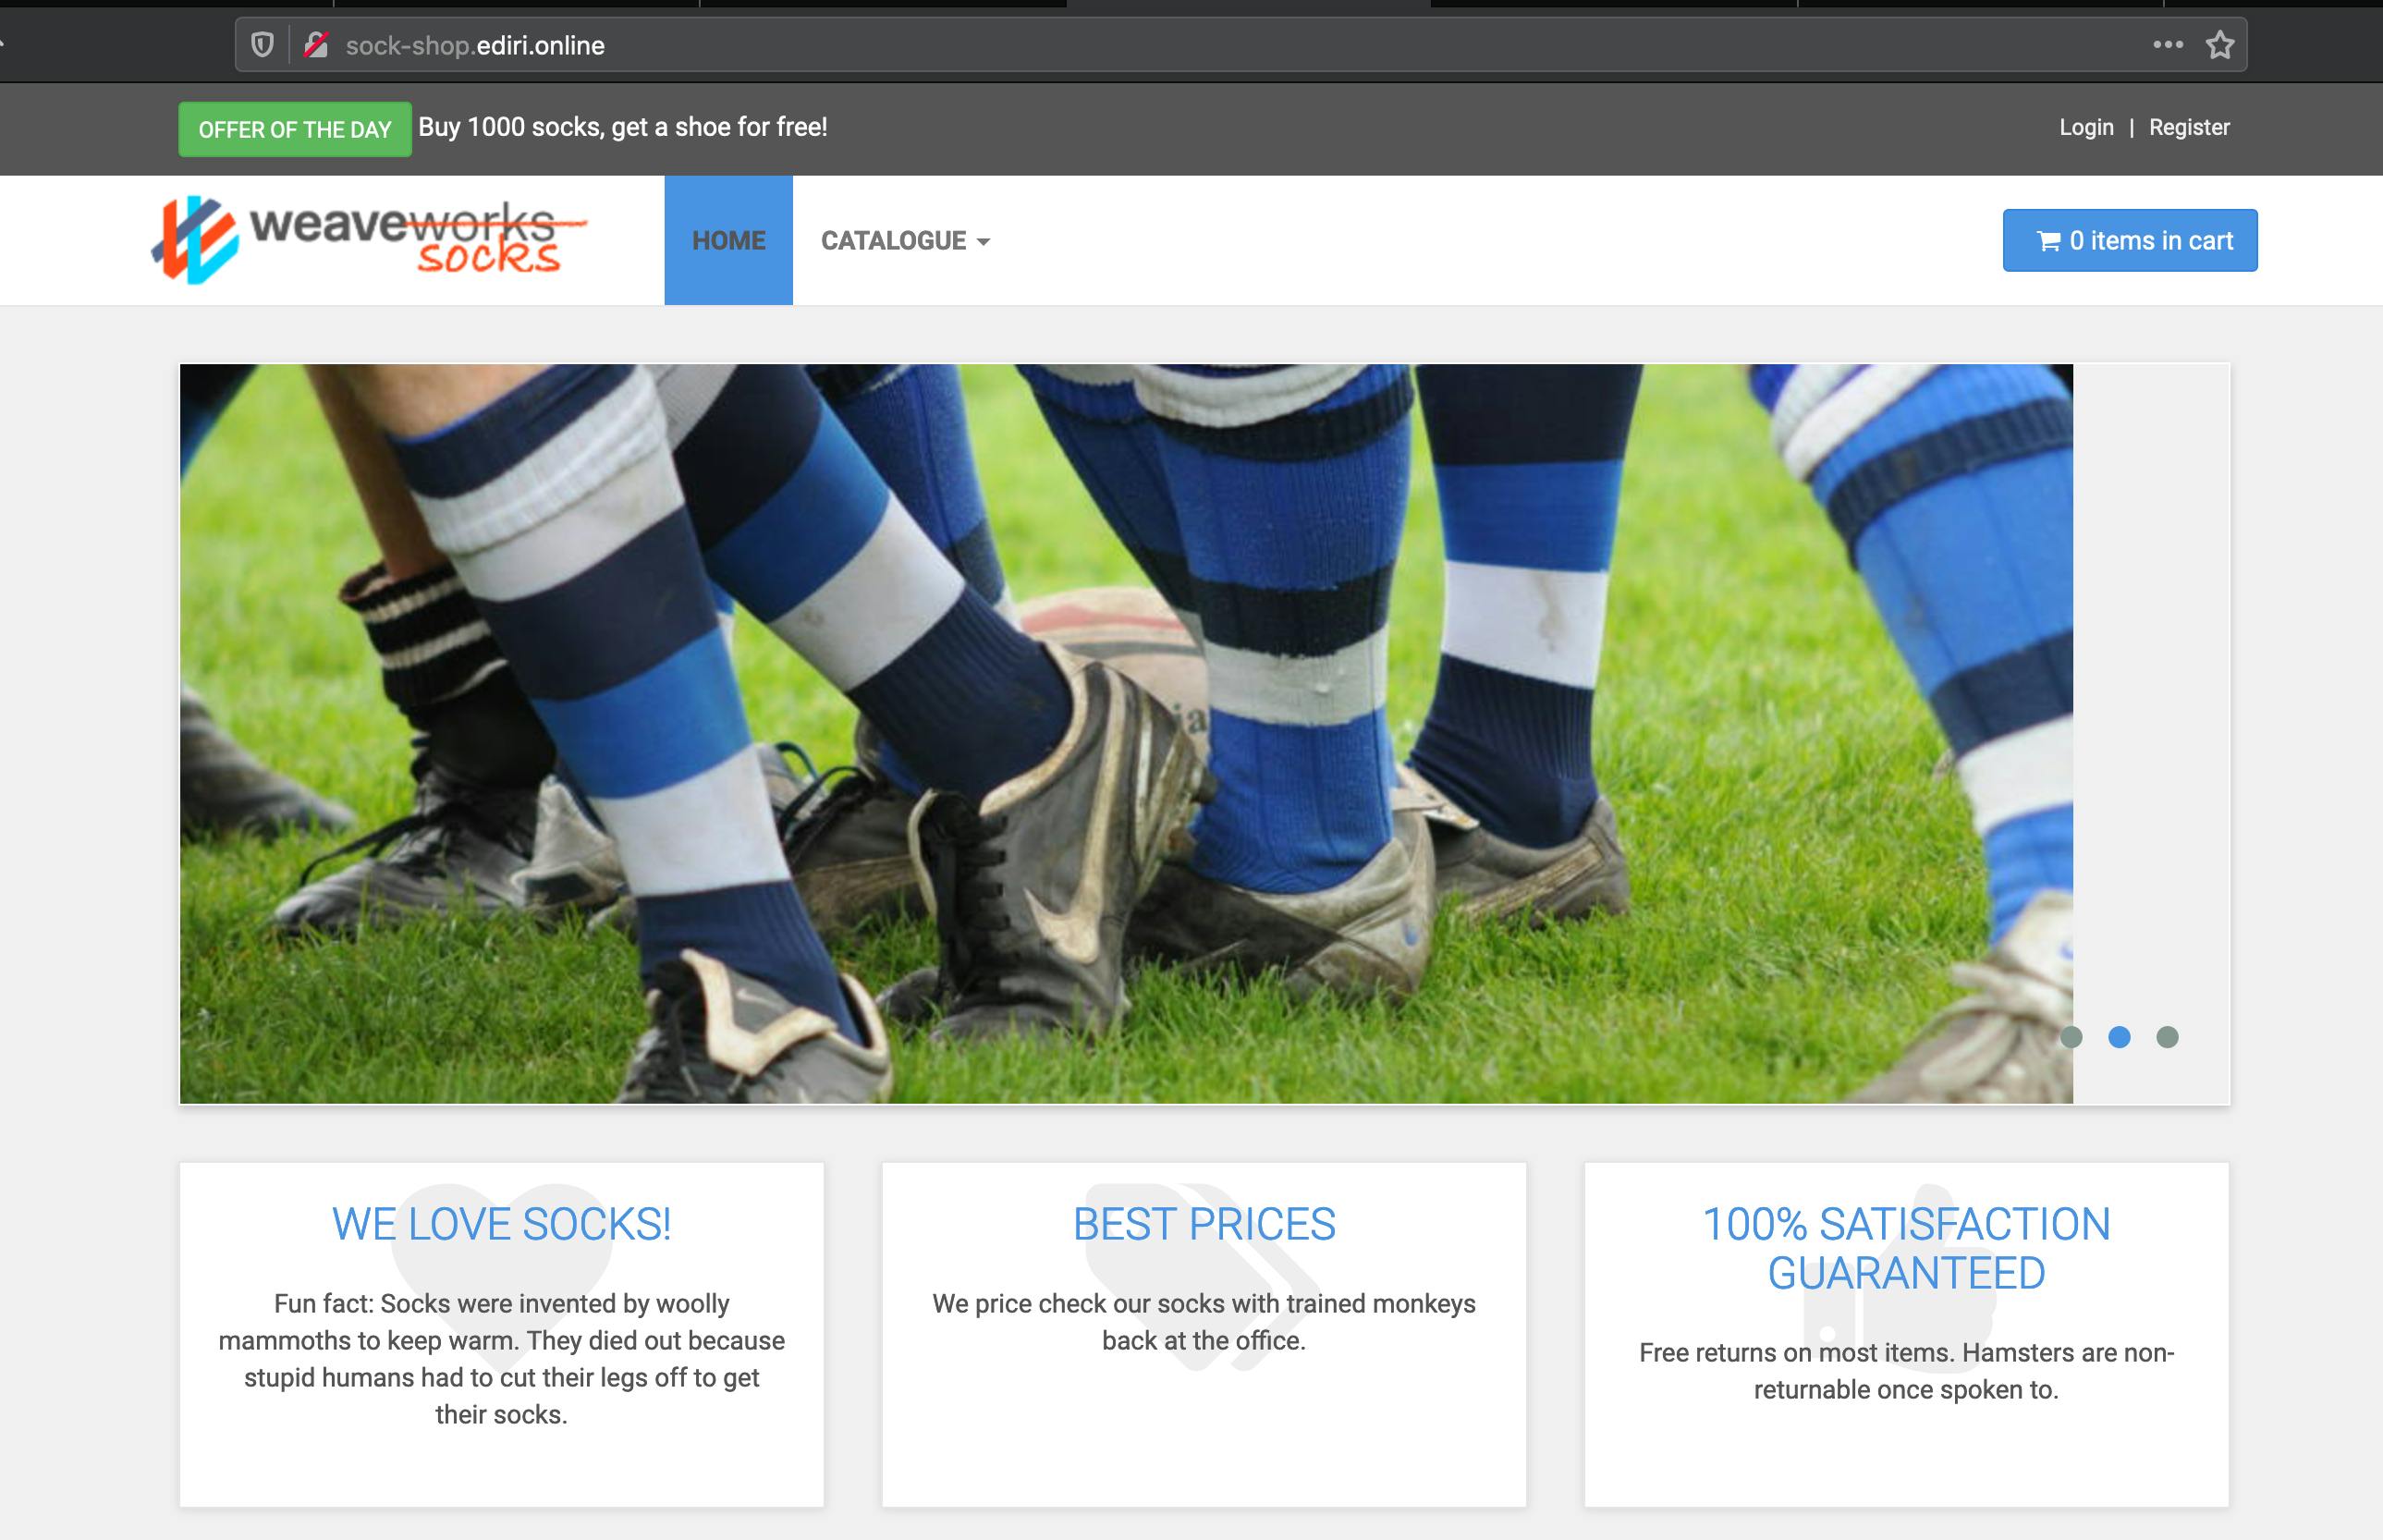
Open a broweser and type the URL your provided and you should be greeted with the webshop:
Cleanup
Type make destroy to clean up all the cloud resources, you just created.
Always clean up your unused cloud resources: Avoid cloud waste and save money!
Wrap up
As we saw, Flux Bucket is a simple way to deploy your kubernetes manifests to a S3 bucket and then use Flux to deploy them.
It's the same way, as you would you use a Git repository.